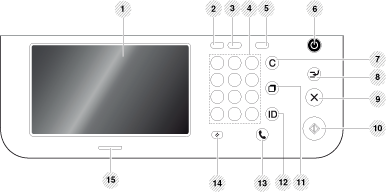
Control panel

|
1 |
Display screen |
Shows the current machine status and prompts during an operation. You can set menus easily using the display screen. |
|
2 |
|
Shows the jobs currently running, queued jobs, completed jobs, current error code or secured jobs. |
|
3 |
|
Shows the amount of paper used (see button). |
|
4 |
Numeric keypad |
Dials numbers and enters alphanumeric characters. You can also enter the number value for document copies or other options. |
|
5 |
|
Turn on Eco mode. Turn on the Eco mode to reduce toner consumption and paper usage when pc-printing and copying only (see button). |
|
6 |
|
Turns the power on or off. When the blue LED is on, the machine is powered on and you can use it. To turn the machine off, press and hole this button for at least 3 seconds. Press when the confirmation window appears. |
|
7 |
|
Deletes characters in the edit area. |
|
8 |
|
Stops a job in operation for urgent copying. |
|
9 |
Stops an operation at any time. The pop-up window appears on the screen showing the current job that the user can stop or resume. |
|
|
10 |
|
Starts a job. |
|
11 |
|
Redials the recently sent fax number or received caller ID in ready mode, or inserts a pause (-) into a fax number in edit mode. |
|
12 |
|
Allows user to log out. |
|
13 |
|
When you press this button, you can hear a dial tone. Then enter a fax number. It is similar to making a call using a speaker phone. |
|
14 |
|
Resets the current machine setup. |
|
15 |
LED |
Shows the status of your machine (see Understanding the LEDs). |
|
|
|
|
When you use the display screen, use your finger only. The screen may be damaged with a sharp pen or anything else. |