If printing quality problems occur or if you use your machine in a dusty environment, you need to clean your machine regularly to keep it in the best printing condition and use your machine longer.
|
|
|
|
Clean the machine cabinet with a soft, lint-free cloth. Dampen the cloth slightly with water, but be careful not to let any water drip onto or into the machine.
During the printing process, paper, toner, and dust particles can accumulate inside the machine. These accumulations can cause print quality problems, such as toner specks or smearing. Cleaning the inside of the machine clears and reduces printing quality problems.
|
|
|
|
|
|
|
|
-
Turn the machine off and unplug the power cord. Wait for the machine to cool down.
-
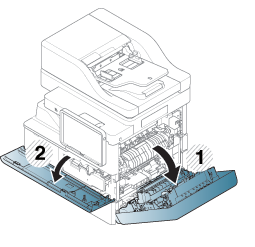
Open the front door.
![[Note]](../../common/icon_note.png)
Toner particles can be released inside the machine but it does not mean the machine is damaged. Contact a service representative when print quality problems occur.
-
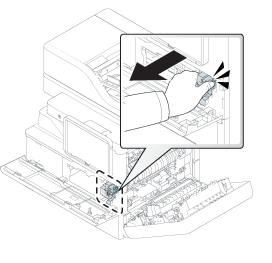
Pull the corresponding toner cartridge out from the machine.
-
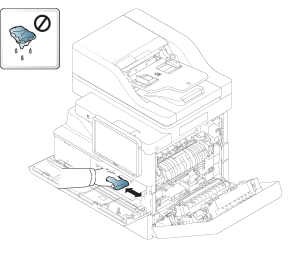
With a dry, lint-free cloth, wipe away any dust and spilled toner from the toner cartridge area.

![[Caution]](../../common/icon_caution.png)
-
While cleaning the inside of the machine, be careful not to damage the transfer roller or any other inside parts. Do not use solvents such as benzene or thinner to clean. Printing quality problems can occur and cause damage to the machine.
-
To prevent damage to the machine when cover opens, do not expose it to light for more than a few minutes.
-
-
Hold the toner cartridge and align it with the corresponding slot inside the machine. Insert it back into its slot until it locks in place.

-
Close the front door. Ensure that the door is securely closed.

If the front door is not completely closed, the machine will not operate.
-
Plug in the power cord and turn the machine on.
-
Open the front door.
-
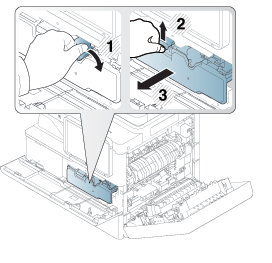
Open the side cover, Hold and push down the lever.
-
Open the inner cover and pull the corresponding imaging unit out from the machine.
-
To prevent damage to the imaging unit, do not expose it to light for more than a few minutes. Cover it with a piece of paper, if necessary.
-
Do not touch the green surface underside of the imaging unit.
-
-
With a dry, lint-free cloth, wipe away any dust and spilled toner from the imaging unit area.
-
Hold the handles on the new imaging unit, and push the imaging unit until it locks into place.

-
Hold the toner cartridge and align it with the corresponding slot inside the machine. Insert it back into its slot until it locks in place.
-
Close the side and front cover. Ensure that the door is securely closed.
If the front door is not completely closed, the machine will not operate.
Keeping the scan unit clean helps to ensure the best possible copy quality. We suggest that you clean the scan unit at the start of each day and during the day, as needed.
-
Prepare a soft, lint-free cloth.
-
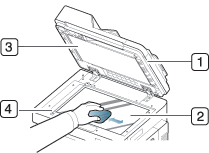
Open the scanner lid.
-
Wipe the surface of the scanner glass and the document feeder glass with the cloth until it is clean and dry.
-
Scanner lid
-
Scanner glass
-
White sheet
-
Document feeder glass
-
-
Wipe the underside of the scanner lid and white sheet until it is clean and dry.
-
Close the scanner lid.