Consumables and accessories
This guide provides information on purchasing Consumables, accessories and maintenance parts available for your machine.
![[Note]](../common/note.png)
|
|
|
Available accessories may differ from country to country. Contact your sales representatives to obtain the list of available accessories. |
How to purchase
To order Samsung-authorized Consumables, accessories and maintenance parts, contact your local Samsung dealer or the retailer where you purchased your machine. You can also visit www.samsung.com/supplies, select your country/region, and obtain information on calling for service.
When Consumables reach their lifespan, you can order the following types of Consumables for your machine.
|
|
|
|
Depending on the options and job mode used, the toner cartridge’s lifespan may differ. |
![[Caution]](../common/caution.png)
|
|
|
You must purchase Consumables, including toner cartridges, in the same country where you purchased your machine. Otherwise, Consumables will be incompatible with your machine since the system configuration of these vary from country to country. |
|
Type |
Average yield[a] |
Part name |
|---|---|---|
|
Toner cartridge |
Average continuous black and color cartridge yield: Approx. 20,000 standard pages. |
|
|
Imaging unit |
Approx. 40,000 pages |
|
|
Waste toner container |
Approx. 20,000 images[b] |
|
|
[a] Declared yield value in accordance with ISO/IEC 19798. The number of pages may be affected by operating environment, printing interval, graphics, media type and media size. [b] Image counts are based on one color on each page. If you print documents in full color (Yellow, Magenta, Cyan, Black), the image count will be added by 4 images. |
||
-
Disconnect the power cord.
Never remove the control board cover while the power is turned on.
To avoid the possibility of an electrical shock, always disconnect the power cord when installing or removing ANY internal or external accessories.
-
Discharge static electricity.
The control board and internal accessories (network interface card or memory module) are sensitive to static electricity. Before installing or removing any internal accessories, discharge static electricity from your body by touching something metal, such as the metal back plate on any device plugged into a grounded power source. If you walk around before finishing the installation, repeat this procedure to discharge any static electricity again.
-
Activating the added accessories in the PS driver properties.
After installing an accessory such as an optional tray, PS driver users must do the additional setting. Go to the PS printer properties and set the added accessory activated.
|
|
|
|
When installing accessories, the battery inside the machine is a service component. Do not change it by yourself. There is a risk of an explosion if battery is replaced by an incorrect type. Dispose used batteries according to the instructions. |
You can purchase and install accessories to enhance your machine’s performance and capacity.
|
Accessory |
function |
Part name |
|||
|---|---|---|---|---|---|
|
Triple Cassette Feeder |
If you are experiencing frequent paper supply problems, you can attach up to three additional 520 sheet trays. You can print documents in various sizes and types of print materials in each tray. |
CLX-S8640T |
|||
|
Second Cassette Feeder with stand |
You can place the machine on the ergonomically-designed cabinet which lets you reach the machine conveniently. Also, you can easily move the cabinet with its wheels. |
CLX-DSK20M
|
|||
|
Fax kit |
This kit lets you use your machine as a fax machine. |
CLX-FAX170
|
|||
|
2-Bin Finisher(Stacker &Stapler) |
The 2-Bin Finisher consists of big size output tray which holds up to 500 sheets of paper and small size output tray which holds up to 100 sheets of paper. |
CLX-FIN25S |
|||
|
Staple Cartridge |
3 x 5,000 staples per package, covers maximum thickness of 50 sheets, 1 staple position. |
SCX-STP000 |
|||
|
FDI (Foreign Device Interface) kit |
This card is installed inside the machine to allow a third party device such as a coin operated device or a card reader. Those devices allow the pay-for-print service on your machine. |
CLX-KIT20F |
Replacing the staple cartridge
When the stapler is completely empty, the message for installing the staple cartridge appears on the display screen.
-
Open the 2Bin Finisher front cover.

-
Pull the stapler unit out.

-
Lift the empty staple cartridge form the stapler unit.

-
Unpack the new staple cartridge.
-
Place the staple cartridge back into the stapler unit.

-
Slide the stapler unit in until it locks in place.
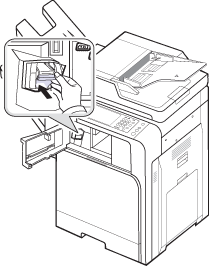
-
Close the 2Finisher front cover.
Checking replaceable’s lifespan
If you experience frequent paper jams or printing problems, check the remaining lifespan of Consumables. Replace the corresponding parts, if necessary.
-
Press > > from the main screen.

-
Check the Consumables life.
-
Press (
 ) for
return to the previous screen.
) for
return to the previous screen.