|
|
|
|
Wireless network name and network password
Wireless networks require higher security, so when an access point is first set up, a network name (SSID), the type of security used, and a Network Password are created for the network. Ask your network administrator about this information before proceeding with the machine installation.
Introducing wireless set up methods
You can set wireless settings either from the machine or the computer. Choose the setting method from the below table.
|
|
|
|
|
Connecting Type |
Description & Reference |
|
|---|---|---|
|
With Access Point |
|
|
|
Without Access Point |
Using Wi-Fi Direct |
|
Setting up on the display / touch screen
Before starting, you will need to know the network name (SSID) of your wireless network and the network key if it is encrypted. This information was set when the access point (or wireless router) was installed. If you do not know about your wireless environment, please ask the person who set up your network.
Connecting to a network
|
|
|
|
After completing the wireless network connection, you need to install a machine driver to print from an application (see Installing driver over the network). |
-
Select (
 ) > > > . on
the control panel.
) > > > . on
the control panel.OR
For the model with a touch screen, press
 () > > > > .
 -
Select the setup method you want.
-
(recommended): The machine will display a list of available networks from which to choose. After a network is chosen then printer will prompt for the corresponding security key.
-
: In this mode, users can give or edit manually their own SSID, or choose the security option in detail.
-
Re-connecting to the network
When the wireless connection is lost, the machine automatically tries to re-connect to the access point (or wireless router) with the previously used wireless connection settings and address.
|
|
|
|
In the following cases, the machine automatically re-connects to the wireless network:
|
Canceling the connection process
To cancel the wireless network connection when the machine
is connecting to the wireless network, press and release  () on
the control panel. You need to wait 2 minutes
to re-connect to the wireless network.
() on
the control panel. You need to wait 2 minutes
to re-connect to the wireless network.
Using Wi-Fi Protected Setup™ (WPS)
If your machine and an access point (or wireless router) support Wi-Fi Protected Setup™ (WPS), you can easily set up the secured wireless connection.
|
|
|
|
Items to prepare
-
Check if the access point (or wireless router) supports Wi-Fi Protected Setup™ (WPS).
-
Check if your machine supports Wi-Fi Protected Setup™ (WPS).
-
Networked computer (PIN mode only)
Choosing your type
There are two methods available to connect your machine to a wireless network using WPS.
-
The Push Button Configuration (PBC) method allows you to connect your machine to a wireless network by enabling WPS in your machine and pressing the WPS (PBC) button on a WPS-supported access point (or wireless router).
-
The Personal Identification Number (PIN) method helps you connect your machine to a wireless network by entering the supplied PIN information on a WPS-supported access point (or wireless router).
Factory default in your machine is PBC mode, which is recommended for a typical wireless network environment.
-
Select (
) > > > on the control panel.OR
For the model with a touch screen, press
() > > > > . -
Press .
-
Touch when the confirmation window appears.
Information window appears showing 2 minutes connection processing time.
-
Touch the WPS (PBC) button on the access point (or wireless router).
The messages are displayed on the display screen in the order below:
-
: The machine is connecting to the access point (or wireless router).
-
: When the machine is successfully connected to the wireless network, the WPS LED light stays on.
-
: After completing the wireless network connection process, the AP’s SSID information appears on the display.
-
-
Insert the supplied software CD into your CD-ROM drive, and follow the instructions in the window to set up the wireless network.
-
Select (
) > > > on the control panel.OR
For the model with a touch screen, press
() > > > > . -
Press .
-
Touch when the confirmation window appears.
-
The eight-digit PIN appears on the display.
You need to enter the eight-digit PIN within two minutes on the computer that is connected to the access point (or wireless router).
The messages are displayed on the display screen in the order below:
-
: The machine is connecting to the wireless network.
-
: When the machine is successfully connected to the wireless network, the WPS LED light stays on.
-
: After completing the wireless network connection process, the AP’s SSID information appears on the display.
-
-
Insert the supplied software CD into your CD-ROM drive, and follow the instructions in the window to set up the wireless network.
Setup using Windows
|
|
|
|
Shortcut to the program without the CD: If you have installed the printer driver once, you can access the program without the CD (see Accessing management tools). |
Setting up via USB cable (recommended)
Items to prepare
-
Access point
-
Network-connected computer
-
Software CD that was provided with your machine
-
A machine installed with a wireless network interface
-
USB cable
Creating the infrastructure network
-
Check whether the USB cable is connected to the machine.
-
Turn on your computer, access point, and machine.
-
Insert the supplied software CD into your CD-ROM drive.
If the installation window does not appear, click > > > .
X:\ replacing “X” with the letter, which represents your CD-ROM drive and click .
-
For Windows 8,
If the installation window does not appear, from , select > and search for . Type in X:\Setup.exe, replacing “X” with the letter that represents your CD-ROM drive and click .
If “” pop-up window appears, click the window and select .
-
-
Review and accept the installation agreements in the installation window. Then, click .
-
Select on the screen. Then, click .
-
On the screen, select Then, click .
If your printer is already connected on the network, select
-
After searching, the window shows the wireless network devices. Select the name (SSID) of the access point you want to use and click .
![[Note]](../../common/icon_note.png)
If you cannot find the network name you want to choose, or if you want to set the wireless configuration manually, click .
-
: Enter the SSID of the access point (SSID is case-sensitive).
-
: Select .
-
: Select an authentication type.
: Authentication is not used, and encryption may or may not be used, depending on the need for data security.
: Authentication is used. A device that has a proper WEP key can access the network.
or : Select this option to authenticate the print server based on a WPA Pre-Shared Key. This uses a shared secret key (generally called Pre Shared Key pass phrase), which is manually configured on the access point and each of its clients.
-
: Select the encryption (None, WEP64, WEP128, TKIP, AES).
-
: Enter the encryption network password value.
-
: Confirm the encryption network password value.
-
: If you are using WEP Encryption, select the appropriate .
The wireless network security window appears when the access point has security settings.
Enter the Network Password of the access point (or router).
-
-
When the network connection window appears, disconnect the network cable. Then, click . The network cable connection can interfere with searching for wireless devices.
-
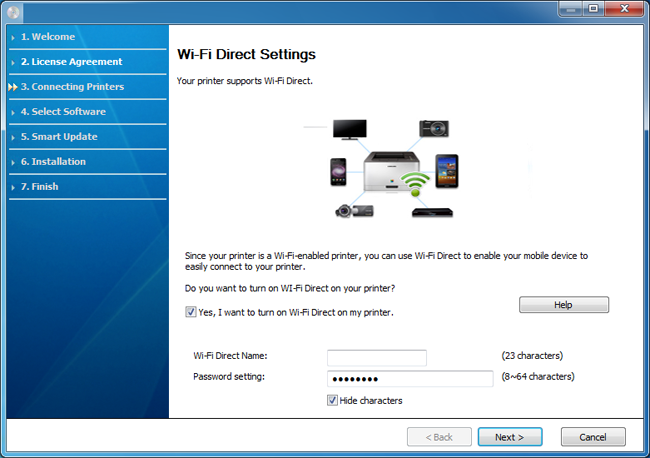
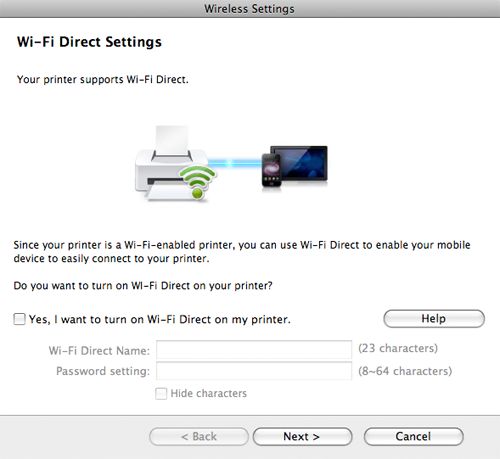
If your printer supports Wi-Fi Direct and this function is disabled, its corresponding screen will appears.
If you want to enable Wi-Fi Direct, check the checkbox, and click . If not, click just .
-
Can start to build Wi-Fi Direct by using Samsung Easy Printer Manager (see Setting up Wi-Fi Direct).
-
: The default Wi-Fi Direct Name is the model name and the maximum length is 22 characters.
-
is the numeric string, and the size is 8 ~ 64 characters.
-
-
When the wireless network set up is completed, disconnect the USB cable between the computer and machine. Click .
-
Follow the instructions in the installation window.
Setup using Mac
Items to prepare
-
Access point
-
Network-connected computer
-
Software CD that was provided with your machine
-
A machine installed with a wireless network interface
-
USB cable
Setting up via USB cable (recommended)
-
Make sure that the machine is connected to your computer andpowered on.
-
Insert the supplied software CD into your CD-ROM drive.
-
Double-click the CD-ROM icon that appears on your Mac desktop.
-
For Mac OS X 10.8, double-click the CD-ROM that appears on .
-
-
Double-click the folder > icon.
-
Click .
-
Read the license agreement and click .
-
Click to agree to the license agreement.
-
Click . All components necessary for machine operations will be installed.
If you click , you can choose individual components to install.
-
Enter the password and click (or ).
-
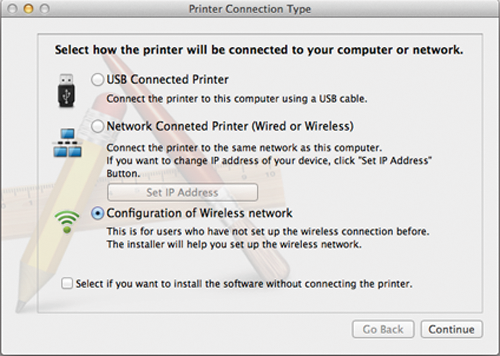
Select on the and click .
-
After searching, the window shows the wireless network devices. Select the name (SSID) of the access point you want to use and click .
When you set the wireless configuration manually, click .
-
: Enter the SSID of the access point (SSID is case-sensitive).
-
: Select .
-
: Select an authentication type.
: Authentication is not used, and encryption may or may not be used, depending on the need for data security.
: Authentication is used. A device that has a proper WEP key can access the network.
or : Select this option to authenticate the print server based on the WPA Pre-Shared Key. This uses a shared secret key (generally called Pre Shared Key pass phrase) that is manually configured on the access point and each of its clients.
-
: Select the encryption. (None, WEP64, WEP128, TKIP, AES)
-
: Enter the encryption network password value.
-
: Confirm the encryption network password value.
-
: If you are using WEP Encryption, select the appropriate .
The wireless network security window appears when the access point has security enabled.
Enter the Network Password of the access point (or router).
-
-
If your printer supports Wi-Fi Direct and this function is disabled, its corresponding screen will appears.
If you want to enable Wi-Fi Direct, check the checkbox, and click . If not, click just .
-
Can start to build Wi-Fi Direct by using Samsung Easy Printer Manager (see Setting up Wi-Fi Direct).
-
: The default Wi-Fi Direct Name is the model name and the maximum length is 22 characters.
-
is the numeric string, and the size is 8 ~ 64 characters.
-
-
When the wireless network settings are completed, disconnect the USB cable between the computer and machine.
-
Wireless network set up is completed. After the installation is finished, click .
|
|
|
|
Machines that do not support the network port will not be able to use this feature (see Rear view). |
Your machine is a network compatible machine. To enable your machine to work with your network, you will need to perform some configuration procedures.
|
|
|
|
Items to prepare
-
Access point
-
Network-connected computer
-
Software CD that was provided with your machine
-
A machine installed with a wireless network interface
-
Network cable
Printing a network configuration report
You can identify the network settings of your machine by printing a network configuration report.
This program is used to manually set the network IP address of your machine using its MAC address to communicate with the machine. The MAC address is the hardware serial number of the network interface and can be found in the Network Configuration Report.
See Setting IP address.
Configuring the machine’s wireless network
Before starting you will need to know the network name (SSID) of your wireless network and the network key if it is encrypted. This information was set when the access point (or wireless router) was installed. If you do not know about your wireless environment, please ask the person who set up your network.
To configure wireless parameters, you can use .
Using SyncThru™ Web Service
Before starting wireless parameter configuration, check the cable connection status.
-
Check whether or not the network cable is connected to the machine. If not, connect the machine with a standard network cable.
-
Start a web browser such as Internet Explorer, Safari, or Firefox and enter your machine’s new IP address in the browser window.
For example,

-
Click on the upper right of the SyncThru™ Web Service website.
-
Type in the and then click . We recommend you to change the default password for security reasons.
-
:
-
:
-
-
When the window opens, click .
-
Click > .
-
Select the one in the list.
-
Click .
If the wireless security setting window appears, enter the registered password (network password) and click .
-
The confirmation window appears, please check your wireless setup. If the setup is right, click .
![[Caution]](../../common/icon_caution.png)
Disconnect the network cable (standard or network). Your machine should then start communicating wirelessly with the network.
Turning the Wi-Fi network on/off
|
|
|
|
If your machine has a display, you can also turn on/off the Wi-Fi from the machine’s control panel using the menu. |
-
Check whether the network cable is connected to the machine. If not, connect the machine with a standard network cable.
-
Start a web browser such as Internet Explorer, Safari, or Firefox and enter your machine’s new IP address in the browser window.
For example,
-
Click on the upper right of the SyncThru™ Web Service website.
-
Type in the and , then click . We recommend you to change the default password for security reasons.
-
:
-
:
-
-
When the window opens, click .
-
Click .
-
You can turn the Wi-Fi network on/off.
Setting the Wi-Fi Direct for mobile printing
Wi-Fi Direct is an easy-to-setup peer-to-peer connection method between the Wi-Fi Direct certified printer and a mobile device that provides a secure connection and better throughput than ad hoc mode.
With Wi-Fi Direct, you can connect your printer to a Wi-Fi Direct network while concurrently connecting to an access point. You can also use a wired network and a Wi-Fi Direct network simultaneously so multiple users can access and print documents both from Wi-Fi Direct and from a wired network.
|
|
|
|
Setting up Wi-Fi Direct
You can enable Wi-Fi Direct feature by one of the following methods.
From the USB cable-connected computer
After the driver installation is complete, Samsung Easy Printer Manager can be used to change Wi-Fi Direct settings.
|
|
|
|
Samsung Easy Printer Manager is Available for Windows and Mac OS users only. |
From the menu, select or > > Samsung Easy Printer Manager > > .
-
: Select to enable.
-
: Enter the printer’s name for searching for your printer on a wireless network. By default, the device name is the model name.
-
: Enter the IP address of the printer. This IP address is used only for the local network and not for the infrastructure wired or wireless network. We recommend using the default local IP address (the default local IP address of the printer for Wi-Fi Direct is 192.168.3.1 )
-
: Activate this option to assign the printer the Wi-Fi Direct group’s owner. The acts similar to a wireless access point. We recommend activating this option.
-
: If your printer is a , a is required for other mobile devices to connect to your printer. You can configure a network password yourself, or can remember the given Network Password that is randomly generated by default.
From the machine
-
Select (
) > > > on the control panel.OR
For the model with a touch screen, press
() > > > > . -
Enable and set other options.
From the network-connected computer
If your printer is using a network cable or a wireless access point, you can enable and configure Wi-Fi Direct from SyncThru™ Web Service.
-
Access and select > > > .
-
Enable ™ and set other options.
Setting up the mobile device
-
After setting up Wi-Fi Direct from the printer, refer to the user manual of the mobile device you are using to set its Wi-Fi Direct.
-
After setting up Wi-Fi Direct, you need to download the mobile printing application (For example: Samsung Mobile print) to print from your smartphone.
|
|
|
|
Troubleshooting for wireless network
Problems during setup or driver installation
-
Your machine may not be turned on. Turn on your computer and the machine.
-
USB cable is not connected between your computer and machine. Connect the machine to your computer using the USB cable.
-
The machine does not support wireless networking. Check the machine's user's guide included on the software CD supplied with your machine and prepare a wireless network machine.
-
-
The machine is unable to find the network name (SSID) you have selected or entered. Check the network name (SSID) on your access point and try connecting again.
-
Your access point is not turned on. Turn on your access point.
-
-
Security is not configured correctly. Check the configured security on your access point and machine.
-
-
Your computer is not receiving a signal from your machine. Check the USB cable and your machine’s power.
-
-
Your machine is connected with a wired network cable. Remove the wired network cable from your machine.
-
-
Cycle the power for the access point (or wireless router) and machine.
-
The configured network address is unable to connect between your computer and machine.
-
For a DHCP network environment
The machine receives the IP address automatically (DHCP) when computer is configured to DHCP.
If the printing job is not working in DHCP mode, the problem may be caused by the automatically changed IP address. Compare the IP address between the product's IP address and the printer port's IP address.
How to compare:
-
Print the network information report of your printer, and then check the IP address (see Printing a network configuration report).
-
Check the printer port's IP address from your computer.
-
Click the Windows menu.
-
For Windows 8, from the , select > .
-
-
For Windows XP/Server 2003, select .
-
For Windows Server 2008/Vista, select > > .
-
For Windows Server 2008 R2, select > > .
-
For Windows 7/ Windows 8, select > .
-
-
Right-click your machine.
-
For Windows XP/2003/2008/Vista, press .
For Windows 7/ Windows 8 or Windows Server 2008 R2, from context menus, select the .
If item has ► mark, you can select other printer drivers connected with selected printer.
-
Click tab.
-
Click button.
-
Check if or is the IP address on the network configuration Sheet.
-
-
Change the printer port's IP address if it is different from the network information report's.
If you want to use the software installation CD to change the port IP, connect to a network printer. Then reconnect the IP address.
-
-
For a Static network environment
The machine uses the static address when the computer is configured to static address.
For example,
If the computer’s network information is as shown below:
-
IP address: 169.254.133.42
-
Subnet Mask: 255.255.0.0
Then the machine’s network information should be as below:
-
IP address: 169.254.133.43
-
Subnet Mask: 255.255.0.0 (Use the computer’s subnet mask.)
-
Gateway: 169.254.133.1
-
-
Other problems
If problems occur while using the machine on a network, check the following:
|
|
|
|
For information on the access point (or wireless router), refer to its own user's guide. |
-
Your computer, access point (or wireless router), or machine may not be turned on.
-
Check the wireless reception around the machine. If the router is far from the machine or there is an obstacle, you might have difficulty receiving the signal.
-
Cycle the power for the access point (or wireless router), machine, and computer. Sometimes cycling the power can recover network communication.
-
Check whether firewall software (V3 or Norton) is blocking the communication.
If the computer and the machine are connected on the same network and it cannot be found when searching, firewall software might be blocking the communication. Refer to the user's guide for the software to turn it off and try searching for the machine again.
-
Check whether the machine's IP address is allocated correctly. You can check the IP address by printing the network configuration report.
-
Check whether the access point (or wireless router) has a configured security (password). If it has a password, refer to the access point (or wireless router) administrator.
-
Check the machine's IP address. Reinstall the machine driver and change the settings to connect to the machine on the network. Due to the characteristics of DHCP, the allocated IP address could change if the machine is not used for a long time or if the access point has been reset.
Register the product's MAC address when you configure the DHCP server on the access point (or wireless router). Then you can always use the IP address that is set with the MAC address. You can identify the Mac address of your machine by printing a network configuration report (see Printing a network configuration report).
-
Check the wireless environment. You might not be able to connect to the network in the infrastructure environment where you need to type in a user's information before connecting to the access point (or wireless router).
-
This machine only supports IEEE 802.11 b/g/n and Wi-Fi. Other wireless communication types (e.g., Bluetooth) are not supported.
-
The machine is within the range of the wireless network.
-
The machine is located away from obstacles that could block the wireless signal.
Remove any large metal objects between the access point (or wireless router) and the machine.
Make sure the machine and wireless access point (or wireless router) are not separated by poles, walls, or support columns containing metal or concrete.
-
The machine is located away from other electronic devices that may interfere with the wireless signal.
Many devices can interfere with the wireless signal, including a microwave oven and some Bluetooth devices.
-
Whenever the configuration of your access point (or wireless router) changes, you must do the product's wireless network setup again.
-
The maximum number of devices that can be connected via Wi-Fi Direct is 4.