Media and tray
This chapter provides information on how to load print media into your machine.
![[Caution]](../../common/caution.png)
|
|
|
![[Warning]](../../common/warning.png)
|
|
|
The use of inflammable media or foreign materials left in the printer may lead to overheating of the unit and, in rare cases may cause a fire. |
Tray overview
To change the size, you need to adjust the paper guides.

|
|
![[Note]](../../common/note.png)
|
|
|
Paper quantity indicator shows the amount of paper in the tray. 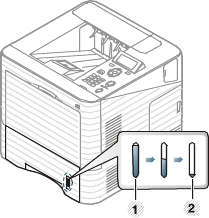
|
Loading paper in the tray/ optional tray
-
Pull out the paper tray (see Tray overview).
-
Flex or fan the edge of the paper stack to separate the pages before loading papers.

-
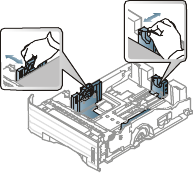
Squeeze and the paper width guide and paper length lever to locate them in the correct paper size slot marked at the bottom of the tray to adjust to the size.
-
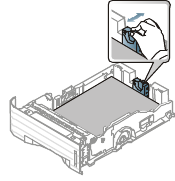
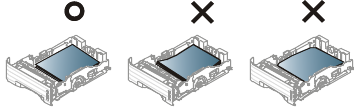
Place paper with the side you want to print on facing down.

-
Slide the paper length guide until it lightly touches the end of the paper stack.
-
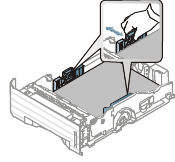
Squeeze the paper width guide and slide it to the edge of the paper stack without causing it to bend.
-
Do not push the paper width guide too far causing the media to warp.
-
If you do not adjust the paper width guide, it may cause paper jams.

-
Do not use a paper with a leading-edge curl, it may cause a paper jam or the paper can be wrinkled.
-
-
Insert the tray back into the machine.
-
Set the paper type and size for tray 1 (see Setting the paper size and type).
The settings set from the machine driver override the settings on the control panel.
-
To print from an application, open an application and start the print menu.
-
Open (see Opening printing preferences).
-
Press the tab in , and select an appropriate paper type.
-
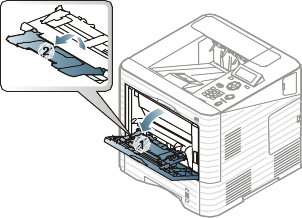
Loading in multi-purpose tray
The multi-purpose tray can hold special sizes and types of print material, such as postcards, note cards, and envelopes.
|
|
|
|
Tips on using the multi-purpose tray
|
-
Open the multi-purpose tray and unfold the multi-purpose tray extension, as shown.
-
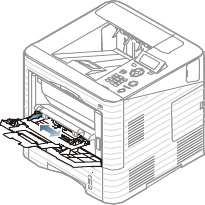
Adjust the multi-purpose tray paper width guides to the width of the paper.
-
Flex or fan the edge of the paper stack to separate the pages before loading paper.
-
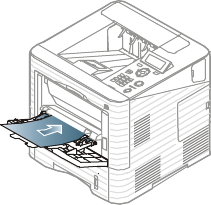
Load the paper. Squeeze the multi-purpose tray paper width guides and adjust them to the width of the paper.
-
Set the paper type and size from the control panel (see Setting the paper size and type).
The settings set from the machine’s driver override the settings on the control panel.
-
To print from an application, open an application and start the print menu.
-
Open (see Opening printing preferences).
-
Press the tab in and select an appropriate paper type.
For example, if you want to use a label, set the paper type to .
-
Select in paper source, then press .
-
Start printing in application.
-
Printing on special media
The table below shows the special media usable in each tray.
The media types are shown in the . To get the higest printing quality, select the proper media type from the window > tab > (see Opening printing preferences).
For example, if you want to print on labels, select for .
|
|
|
|
When using special media, we recommend you feed one sheet at a time (see Print media specifications ). |
To see for paper weights for each sheet, refer to Print media specifications .
|
Types |
Tray 1 |
Optional tray |
Multi-purpose tray |
|---|---|---|---|
|
|
● |
● |
● |
|
|
● |
● |
● |
|
|
● |
||
|
|
● |
● |
● |
|
|
● |
● |
● |
|
|
● |
● |
● |
|
|
● |
● |
● |
|
|
● |
● |
● |
|
|
● |
● |
|
|
|
● |
●[a] |
● |
|
|
● |
● |
● |
|
|
● |
● |
● |
|
● |
● |
● |
|
|
|
● |
● |
● |
|
|
● |
● |
● |
|
|
● |
● |
● |
|
[a] Only for optional tray2. [b] When you use recycled paper as a used paper, printout might be wrinkled and/or jamming may occure due to excessive curl. |
|||
( ●: Included, Blank: Not available)
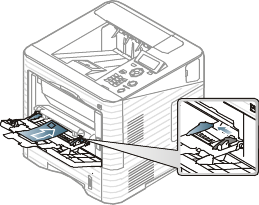
Envelope
Printing successfully on envelopes depends upon the quality of the envelopes.
To print an envelope, place it as shown in the following figure.
-
When selecting envelopes, consider the following factors:
-
Weight: should not exceed 90 g/m2 otherwise; jams may occur.
-
Construction: should lie flat with less than 6 mm curl and should not contain air.
-
Condition: should not be wrinkled, nicked, nor damaged.
-
Temperature: should resist the heat and pressure of the machine during operation.
-
-
Use only well-constructed envelopes with sharp and well-creased folds.
-
Do not use stamped envelopes.
-
Do not use envelopes with clasps, snaps, windows, coated lining, self-adhesive seals, or other synthetic materials.
-
Do not use damaged or poorly made envelopes.
-
Be sure the seam at both ends of the envelope extends all the way to the corner of the envelope.

-
Acceptable
-
Unacceptable
-
-
Envelopes with a peel-off adhesive strip or with more than one flap that folds over to seal must use adhesives compatible with the machine’s fusing temperature for 0.1 second (about 170°C (338 °F)). The extra flaps and strips might cause wrinkling, creasing, or jams, and may even damage the fuser.
-
For the best print quality, position margins no closer than 15 mm from the edges of the envelope.
-
Avoid printing over the area where the envelope’s seams meet.
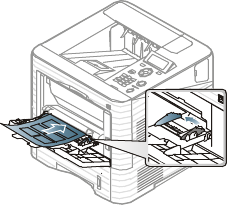
Transparency
|
|
|
|
In case of color printing using transparencies, the picture quality would be lower than mono printing when the printouts are used on the overhead projector. |
To avoid damaging the machine, use only transparencies designed for use in laser printers.
-
Must withstand the machine’s fusing temperature.
-
Place them on a flat surface after removing them from the machine.
-
Do not leave unused transparencies in the paper tray for long. Dust and dirt may accumulate on them, resulting in spotty printing.
-
To avoid smudging caused by fingerprints, handle them carefully.
-
To avoid fading, do not expose printed transparencies to prolonged sunlight.
-
Ensure that transparencies are not wrinkled, curled, or have any torn edges.
-
Do not use transparencies that separate from the backing sheet.
-
To prevent transparencies from sticking to each other, do not let the printed sheets stack up as they are being printed out.
-
Recommended media: Transparency for a color laser printer by Xerox, such as 3R 91331(A4), 3R 2780 (Letter).
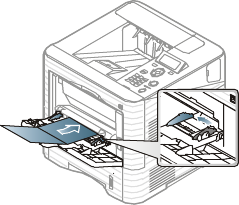
Labels
To avoid damaging the machine, use only labels designed for use in laser printers.
-
When selecting labels, consider the following factors:
-
Adhesives: Should be stable at your machine’s fusing temperature. Check your machine’s specifications to view the fusing temperature (about 170°C (338°F)).
-
Arrangement: Only use labels with no exposed backing between them. Labels can peel off sheets that have spaces between the labels, causing serious jams.
-
Curl: Must lie flat with no more than 13 mm of curl in any direction.
-
Condition: Do not use labels with wrinkles, bubbles, or other indications of separation.
-
-
Make sure that there is no exposed adhesive material between labels. Exposed areas can cause labels to peel off during printing, which can cause paper jams. Exposed adhesive can also cause damage to machine components.
-
Do not run a sheet of labels through the machine more than once. The adhesive backing is designed for only a single pass through the machine.
-
Do not use labels that are separating from the backing sheet or are wrinkled, bubbled, or otherwise damaged.
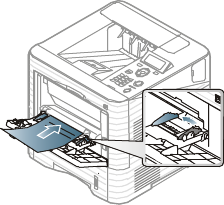
Card stock/ Custom-sized paper
-
In the software application, set margins at least 6.4 mm (0.25 inches) away from the edges of the material.
Letterhead/Preprinted paper
When loading preprinted paper, the printed side should be facing up with an uncurled edge at the front. If you experience problems with paper feeding, turn the paper around. Note that print quality is not guaranteed.
-
Must be printed with heat-resistant ink that will not melt, vaporize, or release hazardous emissions when subjected to the machine’s fusing temperature for 0.1 second (about 170°C (338°F)).
-
Must be non-flammable and should not adversely affect machine rollers.
-
Before you load preprinted paper, verify that the ink on the paper is dry. During the fusing process, wet ink can come off preprinted paper, reducing print quality.
Setting the paper size and type
After loading paper in the paper tray, set the paper size and type using the control panel buttons.
|
|
|
|
ML-451x Series/ ML-501x Series
-
Press
 () button on the
control panel.
() button on the
control panel. -
Press > > Select the tray you want > .
-
Press > > Select the option you want > .
-
Press > > Select the option you want > .
-
Press
 () to return
to ready mode.
() to return
to ready mode.
ML-5015 Series/ ML-5017 Series
-
Press from the Main screen.
-
Press > > .
-
Press the tray you want.
-
Press > Select the option you want.
-
Press the
 button.
 -
Press > Select the option you want.
-
Press the home icon (
 ) to
return to the Standby mode.
) to
return to the Standby mode.