Basic faxing
![[Note]](../../common/note.png)
|
|
|
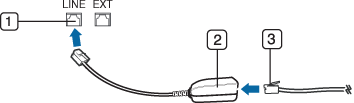
Preparing to fax
Before you send or receive a fax, you need to connect the supplied line cord to your telephone wall jack. Refer to the Quick Installation Guide how to make a connection. The method of making a telephone connection is different from one country to another.
Sending a fax
|
|
|
|
When you place the originals, you can use either the document feeder or the scanner glass. If the originals are placed on both the document feeder and the scanner glass, the machine will read the originals on the document feeder first, which has higher priority in scanning. |
-
Place a single document face down on the document glass, or load the documents face up into the document feeder (see Loading originals).
-
Select
 (fax) on
the control panel.
(fax) on
the control panel.Or select > >
 (settings) on
the touch screen.
(settings) on
the touch screen. -
Adjust the resolution and the darkness to suit your fax needs (see Adjusting the document settings).
-
Enter the destination fax number.
-
Press on the control panel. The machine starts to scan and send the fax to the destinations.
|
|
|
|
Sending a fax manually
Perform the following to send a fax using on the control panel. If your machine is an SCX-4833HD or SCX-5637HR, you can send a fax using the handset.
-
Place a single document face down on the document glass, or load the documents face up into the document feeder (see Loading originals).
-
Select
(fax) on
the control panel.Or select > >
(settings) on
the touch screen. -
Adjust the resolution and the darkness to suit your fax needs (see Adjusting the document settings).
-
Press on the control panel or lift the handset.
-
Enter a fax number using the number keypad on the control panel.
-
Press on the control panel when you hear a high-pitched fax signal from the remote fax machine.
Sending a fax to multiple destinations
You can use the Multiple Send feature, which allows you to send a fax to multiple locations. Originals are automatically stored in memory and sent to a remote station. After transmission, the originals are automatically erased from memory.
-
Place a single document face down on the document glass, or load the documents face up into the document feeder (see Loading originals).
-
Select
(fax) on
the control panel.Or select > or >
(settings) on
the touch screen. -
Adjust the resolution and the darkness to suit your fax needs (see Adjusting the document settings).
-
Select
 () > > on the control panel.
Or select on the touch screen.
-
Enter the number of the first receiving fax machine and press .
You can press speed dial numbers or select a group dial number using the button (see Advanced Guide).
-
Enter the second fax number and press .
The display asks you to enter another fax number to send the document.
-
To enter more fax numbers, press when appears and repeat steps 5 and 6. You can add up to 10 destinations.
Once you have entered a group dial number, you cannot enter another group dial number.
-
When you have finished entering fax numbers, select at the prompt and press .
The machine begins sending the fax to the numbers you entered in the order in which you entered them.
Receiving a fax
Your machine is preset Fax mode at the factory. When you receive a fax, the machine answers the call on a specified number of rings and automatically receives the fax.
Adjusting the document settings
Before starting a fax, change the following settings according to your original’s status to get the best quality.
|
|
|
|
The default document settings produce good results when using typical text-based originals. However, if you send originals that are of poor quality, or contain photographs, you can adjust the resolution to produce a higher quality fax.
|
|
|
|
The resolution setting is applied to the current fax job. To change the default setting (see Advanced Guide). |
-
Select
(fax) > () > > on the
control panel.Or select > select a fax type such as , , , or etc. >
(settings) > on the touch screen. -
Select the option you want and press .
-
: Originals with normal sized characters.
-
: Originals containing small characters or thin lines or originals printed using a dot-matrix printer.
-
: Originals containing extremely fine detail. mode is enabled only if the machine with which you are communicating also supports the Super Fine resolution.
-
For memory transmission, mode is not available. The resolution setting is automatically changed to .
-
When your machine is set to resolution and the fax machine with which you are communicating does not support resolution, the machine transmits using the highest resolution mode supported by the other fax machine.
-
-
: Originals containing shades of gray or photographs.
-
: Original with colors.
-
Memory transmission is not available in this mode.
-
You can only send a color fax if the machine you are communicating with supports color fax reception and you send the fax manually.
-
-
-
Press
 () to
return to ready mode.
() to
return to ready mode.
You can select the degree of darkness of the original document.
|
|
|
|
The darkness setting is applied to the current fax job. To change the default setting (see Advanced Guide). |
-
Select
(fax) > () > > on
the control panel.Or select > select a fax type such as , , , or etc. >
(settings) > on the touch screen. -
Select a dakness level you want.
-
Press
() to
return to ready mode.