Loading paper in the tray
Load the print media you use for the majority of your print jobs into the standard tray. The standard tray can hold a maximum of 1,040 sheets of plain paper.
You can purchase an optional dual cassette feeder and attach it below the standard tray to load an additional 1,040 sheets of plain paper.
|
|
|
|
|
|
|
|
Using photographic paper or coated paper may cause problems, that require repairs. Such repairs are not covered by the warranty or service agreements. |
-
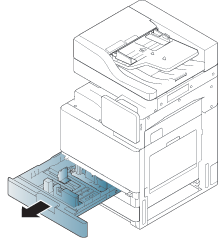
Squeeze the lock lever on the handle and pull out the tray.
-
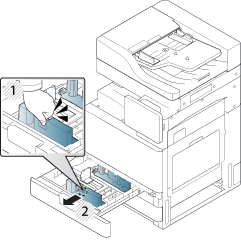
Squeeze the paper length guide, and pull it to the end of the tray.
-
Paper length guide
-
-
Squeeze the paper width guide, and pull it to the end of the tray.
-
Paper width guide
-
-
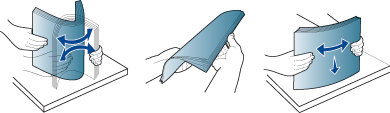
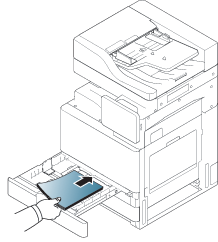
Flex and fan the edge of the paper stack to separate the pages before loading papers.
-
Load paper with the print side facing up.
-
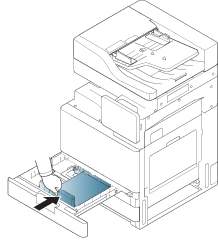
Adjust the paper length guide to the desired paper length.
-
After loading paper into the tray, pinch the paper width guide and move it toward the stack of paper until it lightly touches the side of the stack. Do not press the guide too tightly to the edge of the paper: the guide may bend the paper.
![[Note]](../../common/icon_note.png)
-
Do not push the paper guide too far causing the media to warp.
-
If you do not adjust the paper width guide, it may cause paper jams.

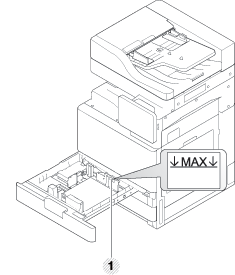
Do not overload the tray: it may cause paper jams. Make sure that the paper is below the maximum paper capacity guide inside the tray.
-
Paper capacity guide
-
-
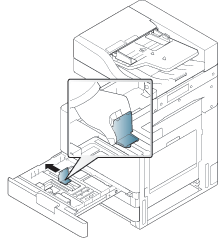
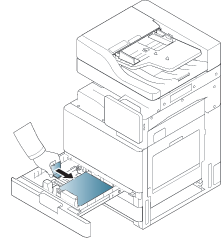
Fix the the paper length guide using the locking switch. Release the locking switch to load a different sized paper.
-
Locking switch
-
-
Insert the tray back into the machine.
When you print a document, set the paper type and size for the tray.
For information about setting the paper type and size on the control panel (see Tray Settings).
The standard tray and optional dual cassette feeder can automatically detect various-sized paper (see Media sizes automatically detected).
If you set the in , the confirmation window appears automatically.
Check if the paper size and type in the tray are detected or not. If you want to set the paper size and type or if the machine cannot detect them, you can set the size and type directly in the confirmation window.
-
If you experience problems with paper feeding, check whether the paper meets the media specifications (see Print media specifications ). Then, try placing one sheet at a time in the multi-purpose tray (see Multi-purpose tray).
-
The settings made from the machine driver override the settings on the control panel.
To print from an application:
-
Open an application and start the print menu.
-
Open (see Opening printing preferences).
-
Press the tab in , and select an appropriate paper type, size, and source.
-
Press .
-
Start printing from an application.
-
-
The multi-purpose tray can hold special sizes and types of print material, such as postcards, note cards, and envelopes. It is useful for single page printing on colored paper.
-
Load only one type, size, and weight of print media at a time in the multi-purpose tray.
-
To prevent paper jams, do not add paper while printing when there is still paper in the multi-purpose tray. This also applies to other types of print media.
-
Print media should be loaded face down with the top edge going into the multi-purpose tray first and be placed in the center of the tray.
-
Always load only the specified print media to avoid paper jams and print quality problems (see Print media specifications ).
-
Flatten any curl on postcards, envelopes, and labels before loading them into the multi-purpose tray.
-
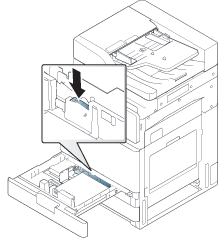
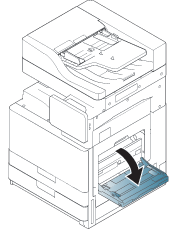
Open the multi-purpose tray and pull out the extention if necessary.
-
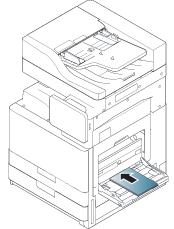
Flex or fan the edge of the paper stack to separate the pages before loading originals.
-
Load the paper with the side to be printed on facing down.
-
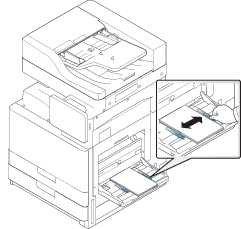
Squeeze the multi-purpose tray paper width guides and adjust them to the width of the paper. Do not force too much, otherwise the paper will bend resulting in a paper jam or skew.
-
When you print a document, set the paper type and size for the multi-purpose tray (see Media sizes automatically detected).
For information about setting the paper type and size on the control panel (see Tray Settings).
The settings made from the machine driver override the settings on the control panel.
To print from an application:
-
Open an application, and start the print menu.
-
Open (see Opening printing preferences).
-
Press the tab in , and select an appropriate paper type, size, and source.
-
Press .
-
Start printing from an application.
-
Media sizes automatically detected
This machine can automatically detect various sized-paper. Refer to the table below.
|
size[a] (Plain) |
Standard tray1,2 |
Optional dual cassette feeder |
Multi-purpose tray |
Duplex printing |
|---|---|---|---|---|
|
Letter SEF[b] |
● |
● |
● |
● |
|
Letter LEF[c] |
● |
● |
● |
● |
|
Ledger |
● (Tray2 only) |
● |
● |
● |
|
Legal SEF |
● |
● |
● |
● |
|
Executive SEF |
● |
● |
● |
● |
|
Executive LEF |
● |
● |
||
|
Statement SEF |
● |
● |
● |
● |
|
A3 SEF |
● (Tray2 only) |
● |
● |
● |
|
A4 SEF |
● |
● |
● |
● |
|
A4 LEF |
● |
● |
● |
● |
|
A5 SEF |
● |
● |
● |
● |
|
A5 LEF |
● |
|||
|
B4 SEF |
● |
● |
● |
● |
|
JIS B5 SEF |
● |
● |
● |
● |
|
JIS B5 LEF |
● |
● |
||
|
A6 SEF |
● |
|||
|
ISO B5 SEF |
● |
● |
● |
● |
|
ISO B5 LEF |
● |
|||
|
Folio SEF |
● |
● |
● |
● |
|
Oficio SEF |
● |
● |
● |
● |
|
8K SEF |
● (Tray2 only) |
● |
● |
● |
|
16K SEF |
● |
● |
● |
● |
|
16K LEF |
● |
● |
||
|
PostCard 4x6 |
● |
|||
|
[a] This machine can detect paper of similar sizes as the listed paper sizes. [b] SEF meaning is Short Edge Feed. [c] LEF meaning is Long Edge Feed. |
||||
(●: Included, Blank: Not available)