Network setup
This chapter gives you step-by-step instructions for setting up the network connected machine and software.
![[Note]](../common/note.png)
|
|
|
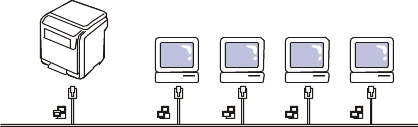
You need to set up the network protocols on the machine to use it as your network machine. You can set up the basic network settings through the machine's control panel.
The following table shows the network environments supported by the machine:
|
Item |
Requirements |
|---|---|
|
Network interface |
|
|
Network operating system |
|
|
Network protocols |
|
|
Wireless Security |
|
There are several programs available to setup the network settings easily in network environment. For the network administrator especially, managing several machines on the network is possible.
|
|
|
|
Before using the programs below, set the IP adress first. |
SyncThru™ Web Service
Web server embedded on your network machine, which allows you to:
-
Configure the network parameters necessary for the machine to connect to various network environments.
-
Customize machine settings.
(See Using SyncThru™ Web Service.)
SyncThru™ Web Admin Service
Web-based machine management solution for network administrators. SyncThru™ Web Admin Service provides you with an efficient way of managing network devices and lets you remotely monitor and troubleshoot network machines from any site with corporate internet access. Download this program from http://solution.samsungprinter.com.
SetIP
This utility program allows you to select a network interface and manually configure the IP addresses for use with the TCP/IP protocol. (See Setting IP address)
|
|
|
|
TCP/IPv6 is not supported by this program. |
You must set up the network protocols on your machine to use it on your network. This chapter will show you how this is easily accomplished.
You can use network after connecting network cable to a corresponding port on your machine.
Printing Network Configuration report
You can print a Network Configuration Report from the machine’s control panel that will show the current machine’s network settings. This will help you to set up a network and troubleshooting problems.
-
Press
 on
the control panel.
on
the control panel. -
Press up/down arrow to highlight and press .
-
Press up/down arrow to highlight and press .
Using this Network Configuration Report, you can find your machine MAC address and IP address.
For example:
-
MAC Address : 00:15:99:41:A2:78
-
IP Address : 192.0.0.192
Setting IP address
First, you have to set up an IP address for network printing and managements. In most cases a new IP address will be automatically assigned by a DHCP (Dynamic Host Configuration Protocol) server located on the network.
IP setting using control panel
-
Connect your machine to the network with a network cable.
-
Turned on the machine.
-
Press
on
the control panel. -
Press up/down arrow to highlight and press .
-
Press up/down arrow to highlight and press .
-
Press up/down arrow to highlight and press .
-
Press up/down arrow to highlight and press .
-
The first available menu item, displays.
-
Enter a number between 0 and 255.
-
-
Use the up/down arrow to enter digits and use the left/right arrow to move between digits. When you finish entering the IP address, press .
-
Enter other parameters, such as the or , and press .
-
After entering all parameters, press
 to
return to ready mode.
to
return to ready mode.
Now go to Installing wired network connected machine’s driver.
Before using the SetIP program, disable the computer firewall from > > .
-
Install this program from the supplied CD-ROM by double-click > SetIP > .
-
Follow the instructions in the installation window.
-
Connect your machine to the network with a network cable.
-
Turn on the machine.
-
From the Windows menu, select > > SetIP > SetIP.
-
Click the
 icon (third
from left) in the SetIP window
to open the TCP/IP configuration window.
icon (third
from left) in the SetIP window
to open the TCP/IP configuration window. -
Enter the machine’s new information into the configuration window as follows. In a corporate intranet, you may need to have this information assigned by a network manager before proceeding.

Find the machine’s MAC address from the Network Configuration Report (see Printing Network Configuration report) and enter it without the colons. For example, 00:15:99:29:51:A8 becomes 0015992951A8.
-
Click , and then click . The machine will automatically print the Network Configuration Report. Confirm that all the settings are correct.
Before using the SetIP program, disable the computer firewall from > > .
|
|
|
|
The following instructions may vary from your model. |
-
Connect your machine to the network with a network cable.
-
Insert the Installation CD-ROM, and open the disk window, select > > > .
-
Double-click the file and will automatically open, then select . The browser will open the page that shows the printer’s name and IP address information.
-
Click the
icon (third
from left) in the SetIP window
to open the TCP/IP configuration window. -
Enter the machine’s new information into the configuration window. In a corporate intranet, you may need to have this information assigned by a network manager before proceeding.
Find the machine’s MAC address from the Network Configuration Report (see Printing Network Configuration report) and enter it without the colons. For example, 00:15:99:29:51:A8 becomes 0015992951A8.
-
Select , then , and again.
-
Quit .
Before using the SetIP program, disable the computer firewall from or .
|
|
|
|
The following instructions may vary from your model or operating systems. |
-
Open //////.
-
Double-click the file.
-
Click to open the TCP/IP configuration window.
-
Enter the machine’s new information into the configuration window. In a corporate intranet, you may need to have this information assigned by a network manager before proceeding.
Find the machine’s MAC address from the Network Configuration Report (see Printing Network Configuration report) and enter it without the colons. For example, 00:15:99:29:51:A8 becomes 0015992951A8.
-
The machine will automatically print the Network Configuration Report.
Network parameter setting
You can also set up the various network settings through the network administration programs such as SyncThru™ Web Admin Service and SyncThru™ Web Service.
Restoring factory default settings
You may need to reset the machine to the factory default settings when machine that you are using is connected to new network environment.
Restoring factory default settings using control panel
-
Press
on
the control panel. -
Press up/down arrow to highlight and press .
-
Press up/down arrow to highlight and press .
-
Turn off and restart machine to apply settings.
Restoring factory default settings using SyncThru™ Web Service
-
Start a web browser such as Internet Explorer, Safari or Firefox and enter your machine’s new IP address in the browser window.
For example,

-
Click to access the SyncThru™ Web Service.
-
Click on the upper right of the SyncThru™ Web Service website.
A log-in page appears.
-
Type in the and then click .
If it’s your first time logging into SyncThru™ Web Service, type in the below default ID and password.
-
:
-
:
-
-
When the window opens, click > > .
-
Click for network.
-
Turn off and restart machine to apply settings.
Installing wired network connected machine’s driver
You must install the printer driver software for printing. The software includes drivers, applications, and other user friendly programs.
Make sure that the network setup for your machine is completed. All applications should be closed on your computer before beginning installation.
-
Make sure that the machine is connected to the network and powered on. Also, your machine’s IP address should have been set.
If the “” appears during the installation procedure, click to close the window.
-
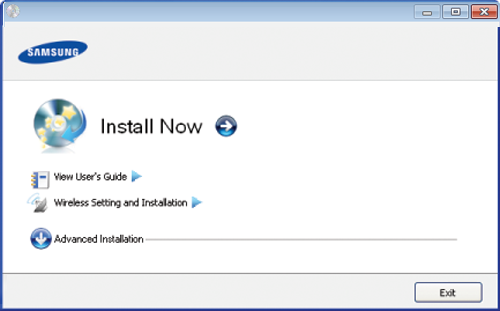
Insert the supplied software CD into your CD-ROM drive.
The software CD should automatically run and an installation window will appear.
-
Select .
When you click the , you can use the option. The allows you to select the machine’s connection and choose individual components to install. Follow the instructions on the window.
-
Read , and select . Then, click .
The program searches for the machine.
If your machine is not found on the network or locally, an error message appears.
-
-
Check this option to install this program without a machine connected. In this case, the print a test page window will be skipped, and completes the installation.
-
-
When you press this button, the firewall notice window appears.
-
Turn off the firewall and . For Windows operating system, click > > , and inactivate this option.
-
Turn off the firewall from the third party's program beside the operating system. Refer to the manual provided by individual programs.
-
-
The allows you to search for a specific machine on the network.
-
: Enter the IP address or the host name. Then click .
To verify your machine’s IP address, print a network configuration report (see Printing Network Configuration report).
-
: To find a shared machine (UNC Path), enter the shared name manually or find a shared printer by clicking the button. Then click .
-
-
If your machine is not connected to the computer or network, this help button gives detailed information about how to connect the machine.
-
If your system administrator set the new on the machine, you can find the machine in the network. Contact your system administrator for new .
-
-
The searched machines will be shown on the screen. Select the one you wish to use and click .
If the driver searched only one machine, the confirmation window appears.
-
Follow the instructions in the installation window.
Silent installation Mode
Silent installation mode is an installation method that does not require any user intervention. Once you start the installation, the machine driver and software are automatically installed on you computer. You can start the silent installation by typing or in the command window.
Command-line Parameters
Following table shows commands that can be used in the command window.
|
|
|
|
Following command-line are effective and operated when command is used with or . But , or /? are exceptional commands that can be operated solely. |
|
Command- line |
Definition |
Description |
||||||
|---|---|---|---|---|---|---|---|---|
|
/s or/S |
Starts silent installation. |
Installs machine drivers without prompting any UIs or user intervention. |
||||||
|
/p”<port name>” or/P”<port name>” |
Specifies printer port.
|
Printer port name can be specified as IP address, hostname, USB local port name or IEEE1284 port name. For example:
|
||||||
|
/a”<dest_path>” or/A”<dest_path>” |
Specifies destination path for installation.
|
Since machine drivers should be installed on the OS specific location, this command applies to only application software. |
||||||
|
/i”<script filename>” or/I”<script filename>” |
Specifies customized install script file for custom operation.
|
Customized script file can be assigned for customized silent installation. This script file can be created or modified through provided installer customizing utility or by text editor.
|
||||||
|
/n”<Printer name>” or/N”<Printer name>” |
Specifies printer name. Printer instance shall be created as specified printer name. |
With this parameter, you can add printer instances as your wishes. |
||||||
|
/nd or/ND |
Commands not to set the installed driver as a default machine driver. |
It indicates installed machine driver will not be the default machine driver on your system if there are one or more printer drivers installed. If there is no installed machine driver on your system, then this option won’t be applied because Windows OS will set installed printer driver as a default machine driver. |
||||||
|
/x or/X |
Uses existing machine driver files to create printer instance if it is already installed. |
This command provides a way to install a printer instance that uses installed printer driver files without installing an additional driver. |
||||||
|
/up”<printer name>” or/UP”<printer name>” |
Removes only specified printer instance and not the driver files. |
This command provides a way to remove only specified printer instance from your system without effecting other printer drivers. It will not remove printer driver files from your system. |
||||||
|
/d or/D |
Uninstalls all device drivers and applications from your system. |
This command will remove all installed device drivers and application software from your system. |
||||||
|
/v”<share name>” or/V”<share name>” |
Shares installed machine and add other available platform drivers for Point & Print. |
It will install all supported Windows OS platform’s machine drivers to system and share it with specified <share name> for point and print. |
||||||
|
/o or /O |
Opens folder after installation. |
This command will open folder after the silent installation. |
||||||
|
/f”<log filename>” or/F”<log filename>” |
Specifies log filename.The default log file is created in the system temp folder if not specified. |
It will create a log file to a specified folder. |
||||||
|
/h, /H or /? |
Shows Command-line Usage. |
Language code
|
Code |
Language |
|---|---|
|
0X0009 |
English |
|
0X0012 |
Korean |
|
0X0804 |
Simplified Chinese |
|
0X0404 |
Traditional Chinese |
|
0x040c |
French |
|
0X0007 |
German |
|
0X0010 |
Italian |
|
0X000a |
Spanish |
|
0X0013 |
Dutch |
|
0X001D |
Swedish |
|
0X0006 |
Danish |
|
0X000b |
Finnish |
|
0X0014 |
Norwegian |
|
0X0019 |
Russian |
|
0X0005 |
Czech |
|
0X000e |
Hungarian |
|
0X0008 |
Greek |
|
0X0816 |
Standard Portuguese |
|
0X0416 |
Brazilian Portuguese |
|
0X0015 |
Polish |
|
0X001F |
Turkish |
|
0X0001 |
Arabic |
|
0X000D |
Hebrew |
|
0x0424 |
Slovenian |
|
0X0418 |
Romanian |
|
0X0402 |
Bulgarian |
|
0X041A |
Croatian |
|
0X081A |
Serbian |
|
0X0422 |
Ukraine |
|
0X041B |
Slovakia |
|
0X0421 |
Indonesian |
|
0x041E |
Thai |
|
0X0429 |
Farsi |
-
Make sure that the machine is connected to your network and powered on. Also, your machine’s IP address should have been set.
-
Insert the supplied software CD into your CD-ROM drive.
-
Double-click the CD-ROM icon that appears on your Macintosh desktop.
-
Double-click the folder.
-
Double-click the icon.
-
Enter the network key and click .
-
The Samsung Installer window opens. Click .
-
Select and click . is recommended for most users. All components necessary for machine operations will be installed.
If you select , you can choose individual components to install.
-
When the message which warns that all applications will close on your computer appears, click .
-
Select and click .
The certificate window appears, click . See Setting IP address to use program.
-
After the installation is finished, click .
-
Open the folder > > .
-
For Mac OS X 10.5~ 10.6, open the folder > and click .
-
-
Click on the .
-
For Mac OS X 10.5~ 10.6, press the “” icon; a display window will pop up.
-
-
For Mac OS X 10.3, select the tab.
-
For Mac OS X 10.4, click .
-
For Mac OS X 10.5~ 10.6, click .
-
-
Select in .
When printing a document containing many pages, printing performance may be enhanced by choosing Socket for option.
-
Enter the machine’s IP address in the field.
-
Enter the queue name in the field. If you cannot determine the queue name for your machine server, try using the default queue first.
-
For Mac OS X 10.3, if Auto Select does not work properly, select in and your machine name in .
-
For Mac OS X 10.4, if Auto Select does not work properly, select in and your machine name in .
-
For Mac OS X 10.5~ 10.6, if Auto Select does not work properly, choose and your machine name in .
Your machine’s IP address appears on the , and is set as the default machine.
-
-
Click .
|
|
|
|
If the printer driver does not work properly, uninstall the driver and reinstall it. Follow steps below to uninstall the driver for Macintosh.
|
Install Linux Driver
-
Make sure that the machine is connected to your network and powered on. Also, your machine’s IP address should have been set.
-
From the Samsung website, download the Unified Linux Driver package to your computer.
-
Right click the package and extract the package.
-
Double click > .
-
The Samsung Installer window opens. Click .
-
The Add printer wizard window opens. Click .
-
Select Network printer and click button.
-
The Printer’s IP address and model name appears on list field.
-
Select your machine and click .
-
Input the printer description and Next
-
When the add printer is done, click Finish
-
When the install is done, click Finish
Add network Printer
-
Double-click the .
-
Click
-
The window opens. Click .
-
Select and click the button.
-
The printer’s IP address and model name appears on list field.
-
Select your machine and click .
-
Input the printer description and
-
When the add printer is done, click .
To use UNIX Printer Driver, you have to install the UNIX printer driver package first, then setup the printer. You can download the UNIX Printer Driver package from the Samsung website.
Installing the UNIX printer driver package
Installation procedure is common for all variants of UNIX OS mentioned.
-
From the Samsung website, download and unpack the UNIX Printer Driver package to your computer.
-
Acquire root privileges.
-
Copy appropriate driver archive to the target UNIX computer.
See administration guide of your UNIX OS for details.
-
Unpack the UNIX printer driver package.
For example, on IBM AIX use the following command(without “).
The “” folder consists of , , files and folders.
-
Copy the “” folder to any local folder.
-
Change to the driver’s “” directory.
-
Run the install script.
is the installer script file which is used to install or uninstall the UNIX Printer Driver package.
Use “” command to give the permission to the installer script.
-
Execute the “” command to verify install results.
-
Run ‘’ from the command line. This will bring up the window. Setup the printer in this window referring the procedure next.
On some UNIX OS, for example on Solaris 10 just added printer may not be enabled and/or may not accept jobs. In this case run the following two commands on the root terminal:
Uninstalling the printer driver package
|
|
|
|
The uninstalling printer utility should be used to delete the printer installed in the system.
|
To reinstall it again, use the command “” to reinstall the binaries.
Setting up the printer
To add the printer to your UNIX system, run ‘installprinter’ from the command line. This will bring up the Add Printer Wizard window. Setup the printer in this window according to the following steps:
-
Type the name of the printer.
-
Select appropriate printer model from model list.
-
Enter any decsription corresponding to the type of the printer in the field. This is optional.
-
Specify any printer description in the field. This is optional.
-
Specify printer location in the field.
-
Type the IP address or DNS name of the printer in the textbox for network-connected printers. On IBM AIX with only DNS name is possible, numeric IP address is not allowed.
-
shows the connection as or in the corresponding list box. Additionally type is available on Sun Solaris OS.
-
Select to set the number of copies.
-
Check the option to receive copies already sorted.
-
Check the option to receive copies in the reverse order.
-
Check the option to set this printer as default.
-
Click to add the printer.
Wireless network setup
|
|
|
|
Make sure your machine supports a wireless network. Wireless network may not be available depending on the model. |
Getting started
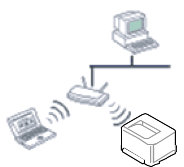
Understanding your network type
Typically, you can only have one connection between your computer and the machine at a time.
Wireless network name and network key
Wireless networks require higher security, so when an access point is first set up, a network name (SSID), the type of security used, and a Network Key are created for the network. Locate this information before proceeding with the machine installation.
You can install a wireless network from the machine’s control panel or the computer.
You can configure wireless parameters with the control panel.
-
See Using the WLAN.
From the computer, we recommend using a USB cable with the program provided in the supplied software CD.
See Setup using Windows.
-
With a USB cable: You can simply set up a wireless network using the program on the supplied software CD. Only Windows and Macintosh operating systems are supported (see Setup using Windows or Setup using Macintosh).
You can also install a wireless network in Samsung Easy Printer Manager () or Printer Settings Utility with a USB cable after installing the driver (Windows and Macintosh operating systems are supported).
-
With a network cable: You can set up a wireless network using the SyncThru™ Web Service program (see Using a network cable).
Using the WLAN
|
|
|
|
Some models may not support this feature. |
Before starting, you will need to know the network name (SSID) of your wireless network and the network key if it is encrypted. This information was set when the access point (or wireless router) was installed. If you do not know about your wireless environment, please ask the person who set up your network.
|
|
|
|
After completing the wireless network connection, you need to install a machine driver to print from an application (see Installing wired network connected machine’s driver). |
-
Press the Press
on
on the control panel. -
Press > > .
-
Press the to select the setup method you want.
-
(recommended): In this mode the setup is automatic. Machine will display a list of available network to choose. After a network is chosen then printer will prompt for the corresponding security Key.
-
: In this mode users can give their own SSID or edit SSID, choose the security manually and apply the settings.
-
Setup using Windows
|
|
|
|
Shortcut to program without CD: If you have installed the printer driver once, you can access the program without CD. From the Start menu, select or > > your printer driver name > . |
Items to prepare
-
Access point
-
Network-connected computer
-
Software CD that was provided with your machine
-
The machine installed with a wireless network interface
-
USB cable
Creating the infrastructure network
-
Check whether the USB cable is connected to the machine.
-
Turn on your computer, access point, and machine.
-
Insert the supplied software CD into your CD-ROM drive.
-
Select the option.
-
: If you have already set up the wireless network, click this button to install the machine’s driver to use the wireless network machine. If you have not set up the wireless network, click the button to set up the wireless network before you click this button.
-
: Configure the wireless network settings of your machine with a USB cable then install the machine driver. This is only for users who have not set up the wireless connection before.
-
-
Read the , and select . Then, click .
-
The software searches the wireless network.
If the search has failed, you may check if the USB cable is properly connected between the computer and machine, and follow the instructions on the window.
-
After searching, the window shows the wireless network devices. Select the name (SSID) of the access point you are using and click .
If you cannot find the network name you want to choose, or if you want to set the wireless configuration manually, click .
-
: Enter the SSID of access point you want (SSID is case-sensitive).
-
: Select .
-
: Select an authentication type.
: Authentication is not used, and encryption may or may not be used, depending on the need for data security.
: Authentication is used. A device that has a proper WEP key can access the network.
or : Select this option to authenticate the print server based on WPA Pre-Shared Key. This uses a shared secret key (generally called Pre- Shared Key pass phrase) which is manually configured on the access point and each of its clients.
-
: Select the encryption (None, WEP64, WEP128, TKIP, AES, TKIP AES).
-
: Enter the encryption network key value.
-
: Confirm the encryption network key value.
-
: If you are using WEP Encryption, select the appropriate .
The wireless network security window appears when the access point has security settings.
The wireless network security window appears. The window may differ according to its security mode: WEP, or WPA.
-
WEP
Select or for the authentication and enter the WEP security key. Click .
WEP (Wired Equivalent Privacy) is a security protocol preventing unauthorized access to your wireless network. WEP encrypts the data portion of each packet exchanged on a wireless network using a 64-bit or 128-bit WEP encryption key.
-
WPA
Enter the WPA shared key and click .
WPA authorizes and identifies users based on a secret key that changes automatically at regular intervals. WPA also uses TKIP (Temporal Key Integrity Protocol) and AES (Advanced Encryption Standard) for data encryption.
-
-
The window shows the wireless network settings and checks if the settings are correct. Click .
-
For the DHCP method
If the IP address assignment method is DHCP, check if DHCP is shown in the window. If it shows Static, click to change the assignment method to DHCP.
-
For the Static method
If the IP address assignment method is Static, check if Static is shown in the window. If it shows DHCP, click to enter the IP address and other network configuration values for the machine. Before entering the IP address for the machine, you must know the computer’s network configuration information. If the computer is set to DHCP, you must contact the network administrator to get the static IP address.
For example:
If the computer’s network information is as shown below:
-
IP address: 169.254.133.42
-
Subnet Mask: 255.255.0.0
Then, the machine’s network information should be as follows:
-
IP address: 169.254.133.43
-
Subnet Mask: 255.255.0.0 (Use the computer’s subnet mask.)
-
Gateway: 169.254.133.1
-
-
-
When the wireless network setting is completed, disconnect the USB cable between the computer and machine. Click .
-
The window appears.
Select if you accept the current settings and continue the setup procedure.
Select if you want to return to the beginning screen.
Then, click .
-
Click when the window appears.
-
Select the components to be installed. Click .
-
After selecting the components, you can also change the machine name, set the machine to be shared on the network, set the machine as the default machine, and change the port name of each machine. Click .
-
After the installation is finished, a window asking you to print a test page appears. If you want to print a test page, click .
Otherwise, just click and go to step 16.
-
If the test page prints out correctly, click .
If not, click to reprint it.
-
To register as a user of the machine in order to receive information from Samsung, click .
-
Click .
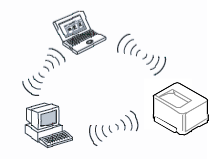
Ad hoc via USB cable
If you do not have an access point (AP), you may still connect the machine wirelessly to your computer by setting up an ad-hoc wireless network by following the simple steps below.
Items to prepare
-
Network-connected computer
-
Software CD that was provided with your machine
-
The machine installed with a wireless network interface
-
USB cable
Creating the ad hoc network in Windows
-
Check whether the USB cable is connected to the machine.
-
Turn on your computer and the wireless network machine.
-
Insert the supplied software CD into your CD-ROM drive.
-
Select the option.
-
: If you have already set up the wireless network, click this button to install the machine’s driver to use the wireless network machine. If you have not set up the wireless network, click the button to set up the wireless network before you click this button.
-
: Configure the wireless network settings of your machine with a USB cable then install the machine driver. This is only for users who have not set up the wireless connection before.
-
-
Read the , and select . Then, click .
-
The software searches the wireless network.
If the software has failed to search the network, check if the USB cable is connected properly between the computer and machine, and follow the instruction in the window.
-
After searching the wireless networks, a list of wireless networks your machine has searched appears.
If you want to use the Samsung default ad hoc setting, select the last wireless network on the list, is and is .
Then, click .
If you want to use other ad hoc settings, select another wireless network from the list.
If you want to change ad hoc settings click the button.
-
: Enter the SSID name you want (SSID is case-sensitive).
-
: Select ad hoc.
-
: Select the channel. ( or 2412 MHz to 2467 MHz).
-
: Select an authentication type.
: Authentication is not used, and encryption may or may not be used, depending on the need for data security.
: Authentication is used. A device that has a proper WEP key can access the network.
-
: Select the encryption (None, WEP64, WEP128).
-
: Enter the encryption network key value.
-
: Confirm the encryption network key value.
-
: If you are using WEP Encryption, select the appropriate .
The wireless network security window appears when the ad hoc network has security setting.
The wireless network security window appears. Select or for the authentication and click .
-
WEP (Wired Equivalent Privacy) is a security protocol preventing unauthorized access to your wireless network. WEP encrypts the data portion of each packet exchanged on a wireless network using a 64-bit or 128-bit WEP encryption key.
-
-
The window showing the wireless network setting appears. Check the settings and click .
Before entering the IP address for the machine, you must know the computer’s network configuration information. If the computer’s network configuration is set to DHCP, the wireless network setting should also be DHCP. Likewise, if the computer’s network configuration is set to Static, the wireless network setting should also be Static.
If your computer is set to DHCP and you want to use the Static wireless network setting, you must contact the network administrator to get the static IP address.
-
For the DHCP method
If the IP address assignment method is DHCP, check if DHCP is shown in the window. If it shows Static, click to change the assignment method to .
-
For the Static method
If the IP address assignment method is Static, check if Static is shown in the window. If it shows DHCP, click to enter the IP address and other network configuration values for the machine.
For example:
If the computer’s network information is as shown follows:
-
IP address: 169.254.133.42
-
Subnet Mask: 255.255.0.0
Then, the machine’s network information should be as below:
-
IP address: 169.254.133.43
-
Subnet Mask: 255.255.0.0 (Use the computer’s subnet mask.)
-
Gateway: 169.254.133.1
-
-
-
When the wireless network settings are completed, disconnect the USB cable between the computer and machine. Click .
If the window appears, follow the steps in the window.
Click if you are finished with the computer’s wireless network settings.
If you set the computer’s wireless network on DHCP, it will take several minutes to receive the IP address.
-
The window appears.
Select if you accept the current settings and continue the setup procedure.
Select if you want to return to the beginning screen.
Then, click .
-
Click when the window appears.
-
Select the components to be installed. Click .
-
After selecting the components, you can also change the machine name, set the machine to be shared on the network, set the machine as the default machine, and change the port name of each machine. Click .
-
After the installation is finished, a window asking you to print a test page appears. If you want to print a test page, click .
Otherwise, just click and go to step 16.
-
If the test page prints out correctly, click .
If not, click to reprint it.
-
To register as a user of the machine in order to receive information from Samsung, click .
-
Click .
Setup using Macintosh
Items to prepare
-
Access point
-
Network-connected computer
-
Software CD that was provided with your machine
-
The machine installed with a wireless network interface
-
USB cable
Access point via USB cable
-
Check whether the USB cable is connected to the machine.
-
Turn on your computer, access point, and machine.
-
Insert the supplied software CD into your CD-ROM drive.
-
Double-click the CD-ROM icon that appears on your Macintosh desktop.
-
Double-click the folder.
-
Double-click the icon.
-
Enter the password and click .
-
Click .
-
Read the license agreement and click .
-
Click to agree to the license agreement.
-
Click .
-
Select and click . is recommended for most users. All components necessary for machine operations will be installed.
If you select , you can choose which individual operations will be installed.
-
Select the option.
-
The software searches the wireless network.
If the search has failed, you may check if the USB cable is connected between the computer and machine properly, and follow the instructions in the window.
-
After searching, the window shows the wireless network devices. Select the name (SSID) of the access point you are using and click .
When you set the wireless configuration manually, click .
-
: Enter the SSID of the access point you want with (SSID is case-sensitive).
-
: Select .
-
: Select an authentication type.
: Authentication is not used, and encryption may or may not be used, depending on the need for data security.
: Authentication is used. A device that has a proper WEP key can access the network.
or : Select this option to authenticate the print server based on WPA Pre-Shared Key. This uses a shared secret key (generally called Pre- Shared Key pass phrase) that is manually configured on the access point and each of its clients.
-
: Select the encryption. (None, WEP64, WEP128, TKIP, AES, TKIP, AES)
-
: Enter the encryption network key value.
-
: Confirm the encryption network key value.
-
: If you are using WEP Encryption, select the appropriate .
The wireless network security window appears when the access point has security setting.
The wireless network security window appears. The window may differ according to its security mode: WEP or WPA.
-
WEP
Select or for the authentication and enter the WEP security key. Click .
WEP (Wired Equivalent Privacy) is a security protocol preventing unauthorized access to your wireless network. WEP encrypts the data portion of each packet exchanged on a wireless network using a 64-bit or 128-bit WEP encryption key.
-
WPA
Enter the WPA shared key and click .
WPA authorizes and identifies users based on a secret key that changes automatically at regular intervals. WPA also uses TKIP (Temporal Key Integrity Protocol) and AES (Advanced Encryption Standard) for data encryption.
-
-
The window shows the wireless network settings and check if settings are right. Click .
-
For the DHCP method
If the IP address assignment method is DHCP, check if DHCP is shown in the window. If it shows Static, click to change the assignment method to DHCP.
-
For the Static method
If the IP address assignment method is Static, check if Static is shown in the window. If it shows DHCP, click to enter the IP address and other network configuration values for the machine. Before entering the IP address for the machine, you must know the computer’s network configuration information. If the computer is set to DHCP, you must contact the network administrator to get the static IP address.
For example:
If the computer’s network information is as shown follows:
-
IP address: 169.254.133.42
-
Subnet Mask: 255.255.0.0
Then, the machine’s network information should be as follows:
-
IP address: 169.254.133.43
-
Subnet Mask: 255.255.0.0 (Use the computer’s subnet mask.)
-
Gateway: 169.254.133.1
-
-
-
The wireless network connects according to the network configuration.
-
When the wireless network settings are completed, disconnect the USB cable between the computer and machine.
-
Follow the instructions on the screen to complete the installation. After the installation is finished, click or .
Ad hoc via USB cable
If you do not have an access point (AP), you may still connect the machine wirelessly to your computer by setting up an ad hoc wireless network by following these simple directions.
Items to prepare
-
Network-connected computer
-
Software CD that provided with your machine
-
The machine installed with a wireless network interface
-
USB cable
Creating the ad hoc network in Macintosh
-
Check whether the USB cable is connected to the machine.
-
Turn on your computer and machine.
-
Insert the supplied software CD into your CD-ROM drive.
-
Double-click the CD-ROM icon that appears on your Macintosh desktop.
-
Double-click the folder.
-
Double-click the icon.
-
Enter the password and click .
-
Click .
-
Read the license agreement and click .
-
Click to agree to the license agreement.
-
Select and click . is recommended for most users. All components necessary for machine operations will be installed.
If you select , you can choose individual operations will be installed.
-
Click .
-
The software searches the wireless network devices.
If the search has failed, check if the USB cable is connected between the computer and machine properly, and follow the instructions in the window.
-
After searching the wireless networks, a list of wireless networks your machine has searched appears.
If you want to use the Samsung default ad hoc setting, select the last wireless network on the list, which is and is .
Then, click .
If you want to use other ad hoc settings, select another wireless network from the list.
If you want to change ad hoc settings click the button.
-
: Enter the SSID name you want (SSID is case-sensitive).
-
: Select ad hoc.
-
: Select the channel ( or 2412 MHz to 2467 MHz).
-
: Select an authentication type.
: Authentication is not used, and encryption may or may not be used, depending on the need for data security.
: Authentication is used. A device that has a proper WEP key can access the network.
-
: Select the encryption (None, WEP64, WEP128).
-
: Enter the encryption network key value.
-
: Confirm the encryption network key value.
-
: If you are using WEP Encryption, select the appropriate .
The wireless network security window appears when the ad hoc network has security setting.
The wireless network security window appears. Select or for the authentication and click .
-
WEP (Wired Equivalent Privacy) is a security protocol preventing unauthorized access to your wireless network. WEP encrypts the data portion of each packet exchanged on a wireless network using a 64-bit or 128-bit WEP encryption key.
-
-
The window showing the wireless network settings appears. Check the settings and click .
Before entering the IP address for the machine, you must know the computer’s network configuration information. If the computer’s network configuration is set to DHCP, the wireless network setting should also be DHCP. Likewise, if the computer’s network configuration is set to Static, the wireless network setting should also be Static.
If your computer is set to DHCP and you want to use Static wireless network setting, you must contact the network administrator to get the static IP address.
-
For the DHCP method
If the IP address assignment method is DHCP, check if DHCP is shown in the window. If it shows Static, click to change the assignment method to .
-
For the Static method
If the IP address assignment method is Static, check if Static is shown in the window. If it shows DHCP, click to enter the IP address and other network configuration values for the machine.
For example:
If the computer’s network information is as shown follows:
-
IP address: 169.254.133.42
-
Subnet Mask: 255.255.0.0
Then, the machine’s network information should be as below:
-
IP address: 169.254.133.43
-
Subnet Mask: 255.255.0.0 (Use the computer’s subnet mask.)
-
Gateway: 169.254.133.1
-
-
-
The wireless network connects according to the network configuration.
-
When the wireless network setting is completed, disconnect the USB cable between the computer and machine.
-
Follow the instructions on the screen to complete the installation. After the installation is finished, click or .
Your machine is a network compatible machine. To enable your machine to work with your network, you will need to perform some configuration procedures.
|
|
|
|
Items to prepare
-
Access point
-
Network-connected computer
-
Software CD that was provided with your machine
-
The machine installed with a wireless network interface
-
Network cable
Printing a network configuration report
You can identify the network settings of your machine by printing a network configuration report.
This program is used to manually set the network IP address of your machine using its MAC address to communicate with the machine. The MAC address is the hardware serial number of the network interface and can be found in the Network Configuration Report.
See Setting IP address.
Configuring the machine’s wireless network
Before starting you will need to know the network name (SSID) of your wireless network and the network key if it is encrypted. This information was set when the access point (or wireless router) was installed. If you do not know about your wireless environment, please ask the person who set up your network.
To configure wireless parameters, you can use .
Using SyncThru™ Web Service
Before starting wireless parameter configuration, check the cable connection status.
-
Check whether or not the network cable is connected to the machine. If not, connect the machine with a standard network cable.
-
Start a web browser such as Internet Explorer, Safari or Firefox and enter your machine’s new IP address in the browser window.
For example,
-
Click on the upper right of the SyncThru™ Web Service website.
-
Type in the and then click .
-
:
-
:
-
-
When the window opens, click .
-
Click > .
will help you setup the wireless network configuration. However, if you want to set the wireless network directly, select .
-
Select the one in the list.
-
: SSID (Service Set Identifier) is a name that identifies a wireless network, access points, and wireless devices attempting to connect to a specific wireless network must use the same SSID. The SSID is case-sensitive.
-
: refers to the type of wireless connections (See Wireless network name and network key).
-
: Allows wireless devices to communicate directly with each other in a peer-to-peer environment.
-
: Allows wireless devices to communicate with each other through an access point.
-
If your network’s is , select the SSID of the access point. If the is , select the machine’s SSID. Note that “portthru” is the default SSID of your machine.
-
-
Click .
If the wireless security setting window appears, enter the registered password (network key) and click .
-
The confirmation window appears, please check your wireless setup. If the setup is right, click .
![[Caution]](../common/caution.png)
Disconnect the network cable (standard or network). Your machine should then start communicating wirelessly with the network. In case of Ad-hoc mode, you can use a wireless LAN and wired LAN simultaneously.
Turning the Wi-Fi network on/off
-
Check whether the network cable is connected to the machine. If not, connect the machine with a standard network cable.
-
Start a web browser such as Internet Explorer, Safari or Firefox and enter your machine’s new IP address in the browser window.
For example,
-
Click on the upper right of the SyncThru™ Web Service website.
-
Type in the and then click .
-
:
-
:
-
-
When the window opens, click .
-
Click > .
You can also turn the Wi-Fi network on/off.
Troubleshooting
Problems during setup or driver installation
-
Your machine may not be turned on. Turn on your computer and the machine.
-
USB cable is not connected between your computer and machine. Connect machine to your computer using the USB cable.
-
The machine does not support a wireless network. Check the machine's user's guide included on the software CD supplied with your machine and prepare a wireless network machine.
-
-
The machine is unable to search the network name (SSID) you have selected or entered. Check the network name (SSID) on your access point and try connecting again.
-
Your access point is not turned on. Turn on your access point.
-
-
You configured security incorrectly. Check the configured security on your access point and machine.
-
-
Your computer is not receiving a signal from your machine. Check the USB cable and your machine’s power.
-
-
Your machine is connected with a wired network cable. Remove the wired network cable from your machine.
-
The configured network address is unable to connect between your computer and machine.
-
For a DHCP network environment
The receives the IP address automatically (DHCP) when computer is configured to DHCP.
-
For a Static network environment
The machine uses the static address when the computer is configured to static address.
For example:
If the computer’s network information is as shown below:
-
IP address: 169.254.133.42
-
Subnet Mask: 255.255.0.0
Then, the machine’s network information should be as below:
-
IP address: 169.254.133.43
-
Subnet Mask: 255.255.0.0 (Use the computer’s subnet mask.)
-
Gateway: 169.254.133.1
-
-
Other problems
If problems occur while using the machine on a network, check the following:
|
|
|
|
For information on the access point (or wireless router), refer to its own user's guide. |
-
Your computer, access point (or wireless router), or machine may not be turned on.
-
Check the wireless reception around the machine. If the router is far from the machine or there is an obstacle, you might have difficulty receiving the signal.
-
Cycle the power for the access point (or wireless router), machine, and computer. Sometimes cycling the power can recover network communication.
-
Check whether firewall software (V3 or Norton) is blocking the communication.
If the computer and the machine are connected on the same network and it cannot be found when searching, firewall software might be blocking the communication. Refer to the user's guide for the software to turn it off and try searching for the machine again.
-
Check whether the machine's IP address is allocated correctly. You can check the IP address by printing the network configuration report.
-
Check whether the access point (or wireless router) has a configured security (password). If it has a password, refer to the access point (or wireless router) administrator.
-
Check the machine's IP address. Reinstall the machine driver and change the settings to connect to the machine on the network. Due to the characteristics of DHCP, the allocated IP address could change if the machine is not used for a long time or if the access point has been reset.
-
Check the wireless environment. You might not be able to connect to the network in the infrastructure environment where you need to type in a user's information before connecting to access point (or wireless router).
-
This machine only supports IEEE 802.11 b/g/n and Wi-Fi. Other wireless communication types (e.g., Bluetooth) are not supported.
-
When using the ad hoc mode, in operating systems such as Windows Vista, you might need to set the wireless connection setting every time you use the wireless machine.
-
You cannot use Infrastructure mode and Ad hoc mode at the same time for Samsung wireless network machines.
-
The machine is within the range of the wireless network.
-
The machine is located away from obstacles that could block the wireless signal.
Remove any large metal objects between the access point (or wireless router) and the machine.
Make sure the machine and wireless access point (or wireless router) are not separated by poles, walls, or support columns containing metal or concrete.
-
The machine is located away from other electronic devices that may interfere with the wireless signal.
Many devices can interfere with the wireless signal, including a microwave oven and some Bluetooth devices.
|
|
|
|
IPv6 is supported properly only in Windows Vista or higher. |
Activating IPv6
-
Connect your machine to the network with a network cable.
-
Turned on the machine.
-
Press
on
the control panel. -
Press up/down arrow to highlight and press .
-
Press up/down arrow to highlight and press .
-
Press up/down arrow to highlight and press .
-
Press up/down arrow to highlight and press .
-
Turn the machine off and turn it on again.
-
Print a Network Configuration Report from the machine’s control panel that will check IPv6 addresses.
-
Press
on
the control panel. -
Press up/down arrow to highlight and press .
-
Press up/down arrow to highlight and press .
-
Using IPv6
In the IPv6 network environment, follow the next procedure to use the IPv6 address.
-
Connect your machine to the network with a network cable.
-
Turn on the machine.
-
Print a Network Configuration Report that will check IPv6 addresses.
-
Select > > .
-
Click in the left pane of the windows.
-
Click in the windows.
-
The window appears. Follow the instructions in the window.
|
|
|
|
If the machine does not work in the network environment, activate IPv6. |
Setting IPv6 addresses
The machine supports the following IPv6 addresses for network printing and managements.
-
: Self-configured local IPv6 address (Address starts with FE80).
-
: Automatically configured IPv6 address by a network router.
-
: IPv6 address configured by a DHCPv6 server.
-
: Manually configured IPv6 address by a user.
DHCPv6 address configuration (Stateful)
If you have a DHCPv6 server on your network, you can set one of the following options for default dynamic host configuration.
-
Press
on
the control panel. -
Press up/down arrow to highlight and press .
-
Press up/down arrow to highlight and press .
-
Press up/down arrow to highlight and press .
-
Press up/down arrow to access the required value.
-
: Use DHCPv6 only when requested by a router.
-
: Always use DHCPv6 regardless of router request.
-
: Never use DHCPv6 regardless of router request.
-
-
Press .
Manual address configuration
-
Start a web browser such as Internet Explorer that supports IPv6 addressing as a URL (See Connecting SyncThru™ Web Service).
For IPv4, enter the IPv4 address (http://xxx.xxx.xxx.xxx) in the address field and press the Enter key or click .
-
Click on the upper right of the SyncThru™ Web Service website.
A log-in page appears.
-
Type in the and then click .
If it’s your first time logging into SyncThru™ Web Service, type in the below default ID and password.
-
:
-
:
-
-
When the window opens, click > .
-
Click .
-
Enable the In the section.
should enable.
-
Select the and click the button, then the router prefix will automatically be entered into the address field.
Enter the rest of address. (ex: 3FFE:10:88:194::AAAA. “A” is the hexadecimal 0 through 9, A through F.)
-
Click the button.
Connecting SyncThru™ Web Service
-
Start a web browser such as Internet Explorer that supports IPv6 addressing as a URL .
-
Click to access the SyncThru™ Web Service.
-
Click on the upper right of the SyncThru™ Web Service website.
A log-in page appears.
-
Type in the and then click .
If it’s your first time logging into SyncThru™ Web Service, type in the below default ID and password.
-
:
-
:
-
-
Select one of the IPv6 addresses (, , , ) from Network Configuration Report.
-
Enter the IPv6 addresses. (ex: http://[FE80::215:99FF:FE66:7701])
Address must be enclosed in '[]' brackets.