Using special copy features

On the Basic, Advanced, or Image tab of the Copy screen, you can select specific copy features.

[Note]

Some menus may not appear in the display depending on options or models.

To change the menu options:

  1. Press Copy from the display screen.

  2. Place the originals face up in the RADF or place a single original face down on the scanner glass and close the RADF (see Loading originals).

  3. If you want to customize the copy settings including reduce/enlarge, darkness, original type, and more from the display screen.

  4. Press the Basic, Advanced, or Image tab from the display screen.

  5. Press the appropriate option.

Item

Description

Paper Source

Paper Source sets the tray containing the paper to be used for printing. The machine prints the scanned image on the paper in the selected tray. You can see the icons that show paper sizes and the remaining amount of paper in each tray.

Reduce/Enlarge

Reduces or enlarges the size of a copied image.

[Note]

If the machine is set to Eco mode, reduce and enlarge features are not available.

Output

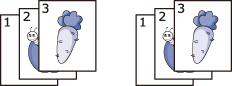
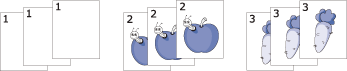
You can select the options for how you want the outputs to be arranged.

  • SortSelect how to sort the output.

    • CollatedThe outputs are in sets to match the sequence of originals.

    • UncollatedThe outputs are sorted into stacks of individual pages.

  • RotateStacks the printouts in criss-crossed sets.

    [Note]
    • This feature is available only when the finisher is not installed.

    • This feature is available only with Letter- and A4-sized print media.

    • Before using this feature, you have to load the paper in the trays with SEF (Short edge feed) and LEF (Long edge feed). For example, direction of paper feeding in tray 1 is SEF, and direction of paper feeding in tray 2 is LEF.

Output

[Note]
  • This feature is available only when the optional finisher is installed.

  • Some features are available only when the optional finisher is installed.

  • OffsetWhen printing multiple copies, this option shifts the output position of each set.

  • Output TrayThis option allows you to specify the tray where to output the printed documents.

  • StapleSpecify the number of staples to use when binding the document (either 1 or 2 staples).

  • PunchSpecify the number of holes to punch in the document (either two or three holes). Some punch kits may offer a 4 Hole option instead of the 3 Hole option.

Darkness

You can adjust the degree of darkness. This feature allows dark images to be printed into lighter images, or light images into darker images.

Duplex

You can set the machine to print copies on both sides of paper.

  • 1 -> 1 SidedScans one side of an original and prints it on one side of the paper.

  • 1 -> 2 Sided

  • 2 -> 1 Sided

  • 2 -> 2 Sided

[Note]

If an original is placed on the scanner glass and you press 1 -> 2 Sided, 2 -> 1 Sided or 2 -> 2 Sided, the message Do you want to scan another page? appears after the first page is copied. Load another original and press Yes. When you finish, press No on this window.

Color Mode

You can select the default color mode to use for copy jobs.

  • Auto[a]Automatically detects whether the scanned document is in color or black and white and then sets the appropriate color setting.

  • Full Color[a]Prints the copy in the same color as the original. Depending on the quality of the original, the quality of the copy may differ from that of the original.

  • B/WPrints the copy in black and white, regardless whether the scanned document is in color or black and white.

Original Size

Copies can be produced after specifying the document scanning size if the document size cannot be detected automatically or if you wish to specify a certain document size.

Original Orientation

When copying double-sided documents or making double-sided copies or combined copies, specify the document orientation; otherwise, the copies may not be printed in the correct page order or correct front and back page arrangement.

  • Upright ImagesSelect this setting for an original document loaded with the top toward the back of the machine.

  • Sideways ImagesSelect this setting for an original document loaded into the RADF with the top of the original document toward the left side of the machine or an original document placed on the scanner glass with the top of the original document toward the right side of the machine.

Original Type

The original type setting is used to improve copy quality by selecting document types for current copy jobs.

  • TextUse for originals containing mostly text.

  • Text/PhotoUse for originals containing text mixed with photographs.

  • PhotoUse when the originals are photographs.

N-Up

Reduces the size of the original images and prints 2 or 9 pages onto one sheet of paper.

  • OffCopies an original onto one sheet of paper.

  • 2UP - 16UPCopies corresponding numbers of separate originals to one page.

[Note]

Depending on original document size, output paper size, and the reduced rate of image, some options may be inactivated.

Booklet

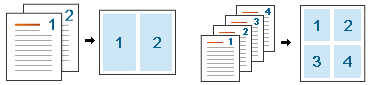
The machine automatically prints on one or both sides of the paper, which are then folded to produce a booklet with all the pages in the correct sequence.

The machine will also reduce and correctly adjust the position of each image to fit on the selected paper.

  • OffDisables this feature.

  • 1 Sided Original: Copies from one side of the original to one page of a booklet.

  • 2 Sided Original Book: Copies each side of an original to one page of a booklet.

  • 2 Sided Original Calendar: Copies each side of an original to one page of a booklet. The second side of each original is rotated 180 degrees so the text will be upright in the booklet.

Book Copy

This feature allows you to copy an entire book. If the book is too thick, lift the cover until its hinges are caught by the stopper and then close the cover. If the book is thicker than 30 mm, start copying with the cover open.

  • OffDisables this feature.

  • Left PagePrints only the left page of the book.

  • Right PagePrints only the right page of the book.

  • Both Pages (From Left) Prints both facing pages from the left page.

  • Both Pages (From Right) Prints both facing pages from the right page.

[Note]

This copy feature is available only when you place originals on the scanner glass.

Adjust Background

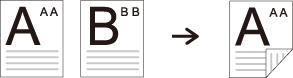
Prints an image without its background. This copy feature removes the background color and can be helpful when copying an original containing color in the background, such as a newspaper or a catalog.

  • OffDisables this feature.

  • AutoOptimizes the background.

  • EnhanceThe higher the number is, the more vivid the background.

  • EraseThe higher the number is, the lighter the background.

Erase Edge

Allows you to erase spots, drill holes, fold creases and staple marks along any of the four edges of a document.

  • OffDisables this feature.

  • Border EraseErases the certain amount of the edge of the printout.

  • Hole Punch EraseErases the marks of bookbinding holes.

Stamp

You can apply the stamp feature.

  • IP AddressThis option allows you to print a IP Address on the printouts.

  • IDThis option allows you to print a user ID on the printouts.

  • Device informationThis option allows you to print a device information on the printouts.

  • CommentThis option allows you to print your comment on the printouts.

  • Date & Time: This option allows you to print time and date stamps on the printouts.

  • Page Number: This option allows you to print page number on the printouts.

Watermark

The watermark option allows you to print text over an existing document. For example, you use it when you want to have large gray letters reading “DRAFT” or “CONFIDENTIAL” printed diagonally across the first page or all pages of a document.

ID Copy

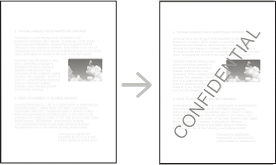
This feature is helpful for copying a small-sized item such as business card (see ID card copying).

Erase Backside Image

When the original is thin and backside images show through, you can use this feature to remove the backside images.

[a] X322x/ X328x series only.