Getting started
This chapter gives you step-by-step instructions for setting up the USB connected machine and software.
This chapter includes:
Setting up the hardware
This section shows the steps to set up the hardware, as is explained in the Quick Install Guide. Make sure you read the Quick Install Guide first and follow the steps below:
-
Select a stable location.
Select a level, stable place with adequate space for air circulation. Allow extra space to open covers and trays.
The area should be well ventilated and away from direct sunlight or sources of heat, cold, and humidity. Do not set the machine close to the edge of your desk or table.
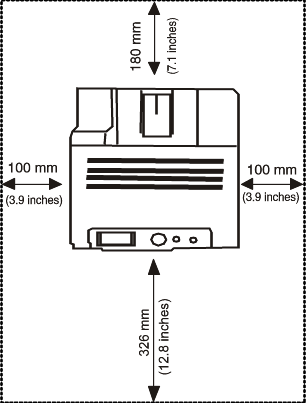
Printing is suitable for altitudes under 1,000 m (3,281 ft). Refer to the altitude setting to optimize your printing. (See Altitude adjustment.)
Place the machine on a flat, stable surface so that there is no incline greater than 2 mm (0.08 inch). Otherwise, printing quality may be affected.
-
Unpack the machine and check all the enclosed items.
-
Remove tape holding the machine securely.
-
Install the toner cartridge.
-
Load paper. (See Loading paper in the tray.)
-
Make sure that all cables are connected to the machine.
-
Turn the machine on.
![[Note]](../common/note.png)
|
|
|
This equipment will be inoperable when mains power fails. |
After you have set up your machine and connected it to your computer, you must install the printer software. If you are a Windows or Macintosh OS, install the software from the supplied CD and if you are a Linux OS user or UNIX OS user, download the software from the Samsung website (www.samsung.com/printer) and install.
|
|
|
|
Machine software are occasionally updated due to release of new operating system and etc. If needed, download the latest version from the Samsung website. (www.samsung.com/printer) |
|
OS |
Contents |
|---|---|
|
|
|
|
|
|
|
System requirements
|
Operating system |
Requirement (recommended) |
||
|---|---|---|---|
|
CPU |
RAM |
free HDD space |
|
|
Windows® 2000 |
Intel® Pentium® II 400 MHz (Pentium III 933 MHz) |
64 MB (128 MB) |
600 MB |
|
Windows® XP |
Intel® Pentium® III 933 MHz (Pentium IV 1 GHz) |
128 MB (256 MB) |
1.5 GB |
|
Windows Server® 2003 |
Intel® Pentium® III 933 MHz (Pentium IV 1 GHz) |
128 MB (512 MB) |
1.25 GB to 2 GB |
|
Windows Server® 2008 |
Intel® Pentium® IV 1 GHz (Pentium IV 2 GHz) |
512 MB (2 GB) |
10 GB |
|
Windows Vista® |
Intel® Pentium® IV 3 GHz |
512 MB (1 GB) |
15 GB |
|
Windows® 7 |
Intel® Pentium® IV 1 GHz 32-bit or 64-bit processor or higher |
1 GB (2 GB) |
16 GB |
|
|||
|
Windows Server® 2008 R2 |
Intel® Pentium® IV 1 GHz (x86) or 1.4 GHz (x64) processors (2 GHz or faster) |
512 MB (2 GB) |
10 GB |
|
|
|
|
|
Operating system |
Requirements (Recommended) |
||
|---|---|---|---|
|
CPU |
RAM |
Free HDD space |
|
|
Mac OS X 10.3 ~ 10.4 |
|
|
1 GB |
|
Mac OS X 10.5 |
|
512 MB (1 GB) |
1 GB |
|
Mac OS X 10.6 |
|
1 GB (2 GB) |
1 GB |
|
Items |
Requirements |
|---|---|
|
Operating system |
RedHat® Enterprise Linux WS 4, 5 (32/64 bit) Fedora 5, 6, 7, 8, 9, 10, 11, 12, 13 (32/ 64 bit) SuSE Linux 10.1 (32 bit) OpenSuSE® 10.2, 10.3, 11.0, 11.1, 11.2 (32/64 bit) Mandriva 2007, 2008, 2009, 2009.1, 2010 (32/64 bit) Ubuntu 6.06, 6.10, 7.04, 7.10, 8.04, 8.10, 9.04, 9.10, 10.04 (32/64 bit) SuSE Linux Enterprise Desktop 10, 11 (32/64 bit) Debian 4.0, 5.0 (32/64 bit) |
|
CPU |
Pentium IV 2.4GHz (Intel Core™2) |
|
RAM |
512 MB (1 GB) |
|
Free HDD space |
1 GB (2 GB) |
A locally connected machine is a machine directly attached to your computer using the cable. If your machine is attached to a network, skip the following steps below and go on to installing a network connected machine’s driver. (See Installing wired network connected machine’s driver.)
|
|
|
|
Windows
-
Make sure that the machine is connected to your computer and powered on.
If the “” appears during the installation procedure, click to close the window.
-
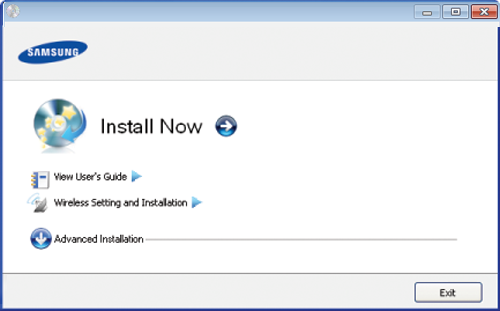
Insert the supplied software CD into your CD-ROM drive.
The software CD should automatically run and an installation window will appear.
-
Select .
-
Read and select Then, click
-
Follow the instructions in the installation window.
|
|
|
|
If the printer driver does not work properly, follow the steps below to uninstall and reinstall the driver.
|
-
Make sure that the machine is connected to your computer and powered on.
-
Insert the supplied software CD into your CD-ROM drive.
-
Double-click the CD-ROM icon that appears on your Macintosh desktop.
-
Double-click the folder.
-
Double-click the icon.
-
Enter the password and click .
-
The Samsung Installer window opens. Click .
-
Read the license agreement and click .
-
Click to agree to the license agreement.
-
Select and click . is recommended for most users. All components necessary for machine operations will be installed.
If you select , you can choose individual components to install.
-
When the message which warns that all applications will close on your computer appears, click .
-
Select and then click .
If you select during the machine driver installation, the SetIP program automatically runs. If the machine has already configured network information, close the SetIP program. Go to the next step.
-
After the installation is finished, click .
-
Open the folder > > .
-
For Mac OS X 10.5~10.6, open the folder > and click .
-
-
Click on the .
-
For Mac OS X 10.5~10.6, click the “” icon; a display window will pop up.
-
-
For Mac OS X 10.3, select the tab.
-
For Mac OS X10.4, click and find the USB connection.
-
For Mac OS X 10.5~10.6, click and find the USB connection.
-
-
For Mac OS X 10.3, if Auto Select does not work properly, select in and your machine name in .
-
For Mac OS X 10.4, if Auto Select does not work properly, select in and your machine name in .
-
For Mac OS X 10.5~10.6, if Auto Select does not work properly, select and your machine name in .
Your machine appears on the , and is set as the default machine.
-
-
Click .
|
|
|
|
If the printer driver does not work properly, uninstall the driver and reinstall it. Follow steps below to uninstall the driver for Macintosh.
|
You need to download the Linux software package from the Samsung website to install the printer software.
Follow the steps below to install the software.
Installing the Linux Unified Driver
-
Make sure that the machine is connected to your computer and powered on.
-
When the window appears, type in root in the field and enter the system password.
You must log in as a super user (root) to install the machine software. If you are not a super user, ask your system administrator.
-
From the Samsung website, download the Unified Linux Driver package to your computer.
-
Right click the package and extract the package.
-
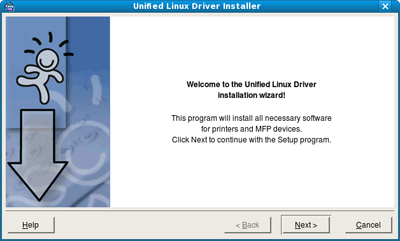
Double click > .
-
When the welcome screen appears, click .
-
When the installation is complete, click .
The installation program has added the Unified Driver Configurator desktop icon and the Unified Driver group to the system menu for your convenience. If you have any difficulties, consult the on screen help that is available through your system menu or can otherwise be called from the driver package Windows applications, such as or .
Installing the SmartPanel
-
Make sure that the machine is connected to your computer and powered on.
-
When the window appears, type in root in the field and enter the system password.
You must log in as a super user (root) to install the machine software. If you are not a super user, ask your system administrator.
-
From the Samsung website, download the package to your computer.
-
Right click the Smart Panel package and extract the package.
-
Double click > > > .
Installing the Printer Settings Utility
-
Make sure that the machine is connected to your computer and powered on.
-
When the window appears, type in root in the field and enter the system password.
You must log in as a super user (root) to install the machine software. If you are not a super user, ask your system administrator.
-
From the Samsung website, download the Printer Setting Utility package to your computer.
-
Right click the package and extract the package.
-
Double click > > > .
|
|
|
|
If the printer driver does not work properly, uninstall the driver and reinstall it again. Follow the steps below to uninstall the driver for Linux.
|