Supplies and accessories
This chapter provides information on purchasing supplies, accessories and maintenance parts available for your machine.
This chapter includes:
![[Note]](../common/note.png)
|
|
|
Available accessories may differ from country to country. Contact your sales representatives to obtain the list of available accessories. |
How to purchase
To order Samsung-authorized supplies, accessories and, maintenance parts, contact your local Samsung dealer or the retailer where you purchased your machine. You can also visit www.samsung.com/supplies, select your country/region, and obtain information on calling for service.
When supplies reach their lifespan, you can order the following types of supplies for your machine:
|
Type |
Average yield |
Part name |
|---|---|---|
|
Standard yield[a] toner cartridge |
Average continuous cartridge yield: 7,000 standard pages. |
CLT-C609S (Cyan) CLT-M609S (Magenta) CLT-Y609S (Yellow) CLT-K609S (Black) Region A[b]: CLT-C6092S (Cyan) CLT-M6092S (Magenta) CLT-Y6092S (Yellow) CLT-K6092S (Black) |
|
Paper transfer belt |
Approx. 50,000 pages |
CLT-T508 |
|
[a] Declared yield value in accordance with ISO/IEC 19798. [b] Region A: Albania, Austria, Belgium, Bosnia, Bulgaria, Croatia, Cyprus, Czech Republic, Denmark, Finland, France, Germany, Greece, Hungary, Italy, Macedonia, Netherlands, Norway, Poland, Portugal, Romania, Serbia, Slovakia, Slovenia, Spain, Sweden, Switzerland, UK. |
||
To replace a toner cartridge. (See Replacing the toner cartridge.)
|
|
|
|
Depending on the options and job mode used, the toner cartridge’s lifespan may differ. |
![[Caution]](../common/caution.png)
|
|
|
You must purchase supplies, including toner cartridges, in the same country where you purchased your machine. Otherwise, supplies will be incompatible with your machine since the system configuration of these vary from country to country. |
You can purchase and install accessories to enhance your machine’s performance and capacity.
|
Accessory |
function |
Part name |
|||
|---|---|---|---|---|---|
|
Extends your machine’s memory capacity. |
ML-MEM170: 512 MB |
||||
|
If you are experiencing frequent paper supply problems, you can attach up to two additional 500 sheet trays. You can print documents in various sizes and types of print materials in each tray. |
CLP-S775A |
||||
|
Allows you to enhance the printer’s capability and print in various ways. |
ML-HDK425 |
||||
|
IEEE 802.11 b/g/n Wireless LAN[a] |
Allows you to connect your printer to a wireless network. |
ML-NWA65L |
|||
|
IEEE1284 Parallel Connector |
Allows you to use various interface.
|
ML-PAR100 |
|||
|
[a] Depending on your country, wireless LAN cards may not be available. Contact your local Samsung dealer or the retailer where you bought your printer. |
|||||
To avoid print quality and paper feed problems resulting from worn parts and to maintain your machine in top working condition, the following parts will need to be replaced after printing the specified number of pages or when the life span of each item has expired.
|
Parts |
Average yield[a] |
|---|---|
|
Fuser unit |
Approx. 100,000 pages |
|
Pickup roller (FCF) |
B4 Approx. 100,000 pages |
|
Pickup roller (MP) |
Approx. 100,000 pages |
|
Pickup roller (SCF) |
Approx. 200,000 pages |
|
Forward (SCF) |
Approx. 200,000 pages |
|
Retard (FCF) |
B4 Approx. 100,000 pages |
|
Friction (MP) |
Approx. 100,000 pages |
|
Retard (SCF) |
Approx. 100,000 pages |
|
Dust cleaning kit |
Approx. 100,000 pages |
|
[a] It will be affected by operating system used, computing performance, application software, connecting method, media type, media size and job complexity. |
|
To purchase maintenance parts, contact the source where you bought the machine.
Replacing maintenance parts can be performed only by an authorized service provider, dealer, or the retailer where you bought the machine. The warranty does not cover the replacement of any maintenance parts after their lifespan.
The machine uses four colors and has a different print cartridge for each one: yellow (Y), magenta (M), cyan (C), and black (K).
-
The status LED and the toner-related message on the display indicate when each individual print cartridge should be replaced.
At this stage, the toner cartridge needs to be replaced. Check the type of the toner cartridge for your machine. (See Available supplies.)
-
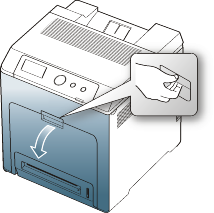
Using the handle, completely open the front cover.
-
Do not touch the green surface, the OPC drum or the front of the print cartridge, with your hands or any other material. Use the handle on each cartridge in order to avoid touching this area.
-
Be careful not to scratch the surface of the paper transfer belt.
-
If you leave the front cover open for more than a few minutes, the OPC drum can be exposed to light. This will cause damage to the OPC drum. Close the front cover when the installation need to be halted for any reason.
-
-
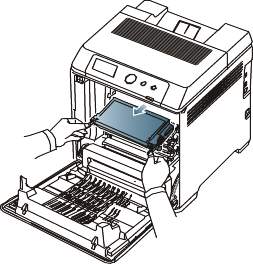
Press the green release handle to release the paper transfer belt. Holding the handle on the paper transfer belt, lift it out of the machine.

-
Grasp the handles on the empty print cartridge and pull to remove the cartridge from the machine.
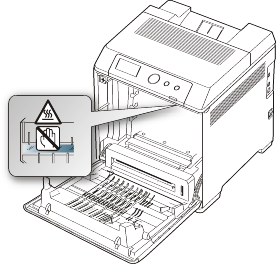
If you open the front cover, be careful not to touch the underneath the control panel (the lower part of the fuser unit). The temperature of the fuser unit might be high and could damage your skin.
When you open the front cover and work inside the machine, it is highly recommend that you remove the paper transfer belt first. Because the work you do could contaminate the paper transfer belt.
-
Remove the new toner cartridge from its bag.
-
Don't use sharp objects, such as a knife or scissors, to open the print cartridge package. You could damage the surface of the print cartridge.
-
To prevent damage, do not expose the print cartridge to light for more than a few minutes. Cover it with a piece of paper to protect it if necessary.
-
-
Slowly shake the cartridge five or six times to distribute the toner evenly inside the cartridge. It will assure maximum copies per cartridge.

-
Place the print cartridge on a flat surface, as shown, and remove the paper covering the print cartridge by removing the tape.

If toner gets on your clothing, wipe it off with a dry cloth and wash clothing in cold water. Hot water sets toner into fabric.
Do not touch the green surface, the OPC drum of the cartridge. Use the handle on the cartridge to avoid touching this area.
-
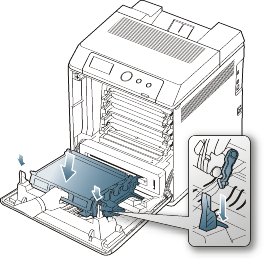
Make sure that the color of the print cartridge matches the color slot and then grasp the handles on the print cartridge. Insert the cartridge until it clicks into place.
-
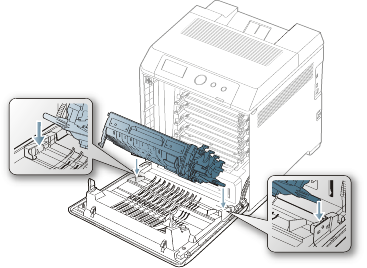
Holding the handle on the paper transfer belt, align it with the slots on the inside of the front cover.
-
Lower the paper transfer belt until it is parallel with the front cover and firmly seated.
-
Close the front cover. Make sure that the cover is securely closed.
If the front cover is not completely closed, the machine will not operate.
After the life span of the paper transfer belt is complete, you have to replace it.
-
The transfer belt-related message appears on the display, telling it's time for a replacement.
|
|
|
|
The life span of the paper transfer belt may be affected by operating environment, printing interval, media type, and media size. |
-
Using the handle, completely open the front cover.
-
Do not touch the green surface, the OPC drum or the front of the print cartridge, with your hands or any other material. Use the handle on each cartridge in order to avoid touching this area.
-
Be careful not to scratch the surface of the paper transfer belt.
-
If you leave the front cover open for more than a few minutes, the OPC drum can be exposed to light. This will cause damage to the OPC drum. Close the front cover should the installation need to be halted for any reason.
-
-
Press the green release handle to release the paper transfer belt. Holding the handle on the paper transfer belt, lift it out of the machine.
-
Remove a new paper transfer belt from its bag.
-
Remove the paper covering the paper transfer belt.
-
Do not use sharp objects, such as a knife or scissors, to open the paper transfer belt package. You could damage the surface of the paper transfer belt.
-
Be careful not to scratch the surface of the paper transfer belt.
-
-
Holding the handle on the new paper transfer belt, align it with the slots on the inside of the front cover.
-
Lower the paper transfer belt until it is parallel with the front cover and firmly seated.
-
Close the front cover to resume printing.
If the front cover is not completely closed, the machine will not operate.
-
Disconnect the power cord.
Never remove the control board cover while the power is turned on.
To avoid the possibility of an electrical shock, always disconnect the power cord when installing or removing ANY internal or external accessories.
-
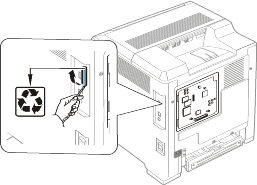
Discharge static electricity.
The control board and internal accessories (network interface card or memory module) are sensitive to static electricity. Before installing or removing any internal accessories, discharge static electricity from your body by touching something metal, such as the metal back plate on any device plugged into a grounded power source. If you walk around before finishing the installation, repeat this procedure to discharge any static electricity again.
-
Activating the added accessories in the PS driver properties.
After installing an accessory such as an optional tray, PS driver users must do the additional setting. Go to the PS printer properties and set the added accessory activated.
|
|
|
|
When installing accessories, the battery inside the machine is a service component. Do not change it by yourself. There is a risk of an explosion if battery is replaced by an incorrect type. Dispose used batteries according to the instructions. |
Activating the added accessories in printer properties
After installing added accessories, you need to select it in the printer properties of the printer driver in order to use it.
-
Install the driver. (See Installing the driver locally or Installing wired network connected machine’s driver.)
-
For Windows 2000, select > .
-
For Windows XP/2003, select .
-
For Windows 2008/Vista, select > > .
-
For Windows 7, select > > .
-
For Windows Server 2008 R2, select > > .
-
-
For Windows 2000, XP, 2003, 2008 and Vista, double-click your machine.
For Windows 7 and Windows Server 2008 R2, right click your printer icon > context menus > .
-
Select the your machine’s driver and right-click to open .
-
In printer driver properties, select .
-
In printer driver properties, set the necessary options.
-
Click .
Your machine has a dual in-line memory module (DIMM). Use this memory module slot to install additional memory. (See Available accessories.)
-
Turn the machine off and unplug all cables from the machine.
-
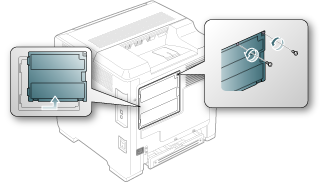
Open the control board cover. Release the screw, then lift up the cover slightly and pull the cover to the right.
-
Take out a new memory module from its plastic bag.
-
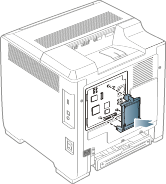
Holding the memory module by the edges, align the memory module on the slot at about a 30-degree tilt. Make sure that the notches of the module and the grooves on the slot fit each other.
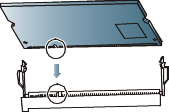
The notches and grooves illustrated above may not match those on an actual memory module and its slot.
-
Press the memory module into the slot with care until you hear a 'click'.
Do not press the memory module strongly or the module may be damaged. If the module does not seem to fit into the slot properly, carefully try the previous procedure again.
-
Replace the control board cover and fasten the cover with the screw.
-
Reconnect the power cord and machine cable. Turn on the machine.
The machine is equipped with a network interface which allows you to use your printer on a network. You can also purchase a wireless network interface card to enable the use of the printer in wireless network environments.
The order information is provided for optional wireless network interface card. (See Available accessories.)
-
Turn the machine off and unplug all cables from the machine.
-
Open the control board cover. Release the screw, then lift up the cover slightly and pull the cover to the right.
-
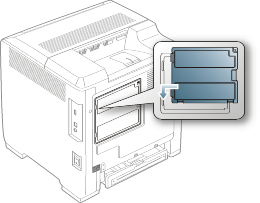
Detach the dummy panel on your machine using a strong stick-like tool, such as a screwdriver.
-
Take out a new wireless interface card from its plastic bag.
-
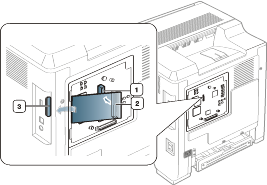
Align the wireless network interface card into the guide, and align the connector on the card with the connector on the control board. Push the card firmly into the connector until it is completely and securely in place.
-
wireless network interface card connector
-
wireless network interface card
-
wireless network interface card guide
-
-
Replace the control board cover and fasten the cover with the screw.
-
Reconnect the power cord and machine cable. Turn on the machine.
-
Set the wireless network environment. (See Wireless network setup.)
Installing the hard disk allows the data from your computer to be sent to the print queue of the printer hard disk. This decreases the workload of the computer. You can also use various print features, such as storing a job in the hard disk, proofing a job, and printing private documents.
The order information is provided for optional hard disk. (See Available accessories.)
Installing a hard disk
-
Turn the machine off and unplug all cables from the machine.
-
Open the control board cover. Release the screw, then lift up the cover slightly and pull the cover to the right.
-
Take out a new hard disk from its plastic bag.
-
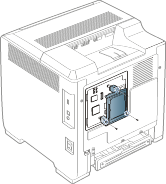
Align the connector on the hard disk with the connector on the control board. Push the hard disk in until it is latched into place.
-
Fasten the screws supplied with your new hard disk.
-
Reconnect the power cord and machine cable. Turn on the machine.
-
You must activate the added hard disk in the driver properties.
(See Activating the added accessories in printer properties.)
Printing with the optional hard disk
|
|
|
|
After installing the optional hard disk, you can use advanced printing features, such as storing or spooling a print job to the hard disk, proofing a job, and specifying of printing a private job in the printer properties window. Once you have stored files in the hard disk, you can easily print or delete the stored files using the control panel of your printer. |
Storing a job
You can store jobs in the installed hard disk.
-
Open the document you want to print.
-
Select from the file menu. The window appears.
-
Select your machine from .
-
Click or .
-
Click the tab and click .
-
Select the print mode you want from the drop-down list.
(See Using help.)
-
Enter the user’s name and file name.
-
Click until the window is displayed.
-
Click or to start printing.
Printing or deleting a stored job
You can print or delete jobs currently stored in the hard disk.
-
Press
 on
the control panel.
on
the control panel. -
Press the up/down arrow to highlight and press .
-
Press the up/down arrow to highlight and press .
-
Press the up/down arrow to highlight the user’s name and file name you want use and press .
If the select file is a confidential print job, enter the specified 4-digit password.
Use the up/down arrow to enter digits and use the left/right arrow to move between digits. When you finnish entering the password, press .
If you enter the incorrect password, appears. Reenter the correct password.
-
Press the up/down arrow to highlight the desired setting and press .
-
: You can print a stored job.
-
: You can delete a stored job.
-
-
When appears, press .
Controlling the active job queue
All of the print jobs waiting to be printed are listed in the active job queue in the order you sent them to the printer. You can delete a job from the queue before printing, or promote a job to print sooner.
-
Press
on
the control panel. -
Press the up/down arrow to highlight and press .
-
Press the up/down arrow to highlight and press .
-
Press the up/down arrow to highlight the user’s name and file name you want use and press .
If the select file is a confidential print job, enter the specified 4-digit password.
Use the up/down arrow to enter digits and use the left/right arrow to move between digits. When you finnish entering the password, press .
If you enter the incorrect password, appears. Reenter the correct password.
-
Press the up/down arrow to highlight the desired setting and press .
-
: You can delete a file from the queue.
-
: You can select a job waiting in the active job queue and change its print order so that it can be printed sooner.
-
: You can print a job scheduled to be printed at a specified time immediately. In this case, the job currently printing is stopped and the selected job will be printed. This function is available when the job is scheduled for later printing.
option appears only when you select a print job.
-
-
When appears, press .
Form file
Form overlay is images stored in the printer hard disk drive (HDD) as a special file format that can be printed in layers on any document.
Creating new form files
-
Create or open a document containing text or an image for use in a new form file.
-
To save the document as a form file, access . (See Opening printing preferences.)
-
Click the tab, and select .
-
In the window, check .
-
Click .
-
Type a file name of up to eight characters in the box. Select the destination path and click .
-
Click or until you exit the window.
-
A confirm message appears, click to save.
The file is not printed. Instead, it is stored on your computer hard disk drive.
If you click , the machine prints your form without saving.
-
A confirm message appears, click to save.
|
|
|
|
The form file size must be the same as the document you print with the form file. |
File Policy
You can choose the file policy for generating file name before you proceed with the job through HDD. If the HDD memory already has the same name when you entered a new file name, you can rename or overwrite it.
-
Press
on
the control panel. -
Press the up/down arrow to highlight and press .
-
Press the up/down arrow to highlight and press .
-
Press the up/down arrow to highlight the desired setting and press .
-
: If the HDD memory already has the same name when you enter a new file name, the file will be saved as a different name that is automatically programmed.
-
: You can set the machine to delete previous job information on HDD as you store new job information.
-
-
Press .
Deleting residual image data
ImageOverwrite is a security measure for customers who are concerned about unauthorized access and duplication of classified or private document.
-
Press
on
the control panel. -
Press the up/down arrow to highlight and press .
-
Press the up/down arrow to highlight and press .
-
Press the up/down arrow to highlight the desired setting and press .
-
Automatic : All residual image data from the machine will be erased immediately after each job has been processed.
-
Manual : This option provides an on-demand facility for a system administrator to erase all the real image data remained in HDD after this option enabled. All existing jobs will be deleted regardless of their status and all job submissions will be prohibited for the duration of the overwrite.
-
-
Press the up/down arrow to move to or for .
Press the up/down arrow to move to or for .
If you selected enabled, the machine confirms if the overwrite feature starts now. Press the up/down arrow to select or . If you select , overwrite starts as soon as you select . If you select , this feature will be enabled.
-
Press .