Introduction
These are the main components of your machine:
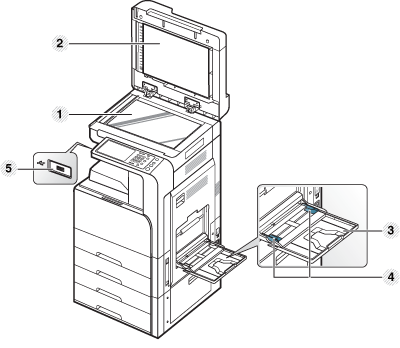
Machine overview

|
1 |
Duplex automatic document feeder cover |
8 |
Dual cassette feeder (tray 3, tray 4)[a] |
|
2 |
Duplex automatic document feeder width guides |
9 |
Standard tray (tray 1, tray 2) |
|
3 |
Duplex automatic document feeder input tray |
10 |
Front door |
|
4 |
Duplex automatic document feeder output tray |
11 |
Front door handle |
|
5 |
Power-switch |
12 |
Paper output tray |
|
6 |
Power receptacle |
13 |
Control panel |
|
7 |
Optional dual cassette feeder right bottom door |
||
|
[a] Optional device. |
|||
|
1 |
Scanner glass |
4 |
Multi-purpose tray paper width guide |
|
2 |
White sheet |
5 |
USB port |
|
3 |
Multi-purpose tray |
|
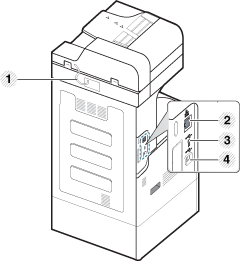
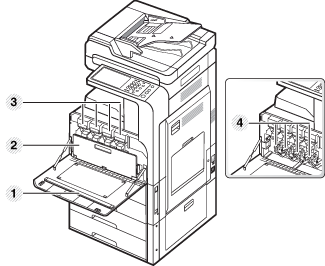
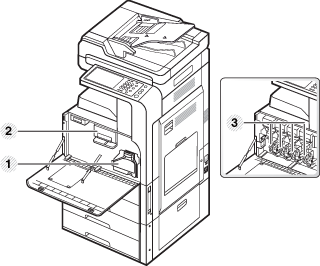
1 |
LSU window cleaning stick |
3 |
Toner Cartridges |
|
2 |
Waste toner container |
4 |
Imaging units |
![[Note]](../common/note.png)
|
|
|
If you want to see the imaging unit, you need to remove the waste toner container. |
|
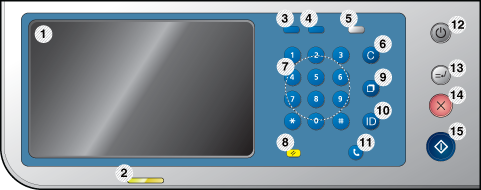
1 |
Display screen |
Shows the current machine status and prompts during an operation. You can set menus easily using the display screen. |
|
2 |
Status LED |
Shows the status of your machine (see Understanding the status LED). |
|
3 |
|
Shows the jobs currently running, queued jobs, completed jobs, current error code or secured jobs. |
|
4 |
|
Shows the amount of paper used (see Counter button). |
|
5 |
|
Turn on Eco mode (see button). |
|
6 |
|
Deletes characters in the edit area. |
|
7 |
Numeric keypad |
Dials numbers and enters alphanumeric characters. You can also enter the number value for document copies or other options. |
|
8 |
|
Resets the current machine setup. |
|
9 |
|
Redials the recently sent fax number or received caller ID in ready mode, or inserts a pause (-) into a fax number in edit mode. |
|
10 |
|
Allows user to log in or log out. |
|
11 |
|
When you press this button, you can hear a dial tone. Then enter a fax number. It is similar to making a call using a speaker phone. |
|
12 |
|
Turns the power on or off. When the blue LED is on, the machine is powered on and you can use it. To turn the machine off, press and hole this button for at least 3 seconds. Press when the confirmation window appears. |
|
13 |
|
Stops a job in operation for urgent copying. |
|
14 |
Stops an operation at any time. The pop-up window appears on the screen showing the current job that the user can stop or resume. |
|
|
15 |
|
Starts a job. |
![[Caution]](../common/caution.png)
|
|
|
When you use the display screen, use your finger only. |
|
Type |
Description |
|

|
Tap (Press) |
Action of quickly pressing and releasing an area of screen (When used with “release”, it will be called a “press’”). |
|
Touch & Move |
When touching the screen, the focus will be moved straight slowly. When releasing, only the focus will be moved. On the touchable view (not item), touch & move will activate and through the touch & move, function will be activated -> micro control activates through touch & move on the video player. |

|
Release |
Action of removing your finger from the screen (The moment that the function is activated). (Used with a “press” or “long press”). |
The color of the status LED indicates the machine's current status.
|
Status |
Description |
||
|---|---|---|---|
|
Off |
|
||
|
Green |
On |
The machine is on-line and can be used. |
|
|
Blinking |
Fax |
The machine is sending or receiving faxes. |
|
|
Copy |
The machine is copying documents. |
||
|
Scan |
The machine is scanning documents. |
||
|
|
|
||
|
Red |
On |
|
|
|
Blinking |
|
||
|
[a] Estimated cartridge life means the expected or estimated toner cartridge life, which indicates the average capacity of print-outs and is designed pursuant to ISO/IEC 19798. The number of pages may be affected by operating environment, printing interval, media type, and media size. Some amount of toner may remain in the cartridge even when the red LED is on and the printer stops printing. |
|||
|
|
|
|
Check the message on the display screen. Follow the instructions in the message or refer to the troubleshooting chapter (see Understanding display messages). If the problem persists, call for service. |
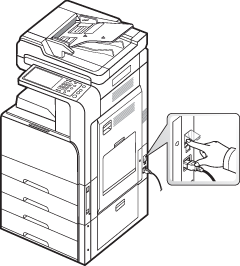
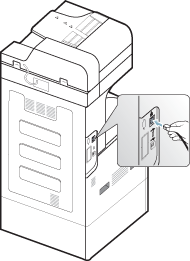
Turning the machine on
|
|
|
|
Keep in mind that you should use the power cord supplied with the machine. Otherwise, it can cause fire or damage to the machine. |
-
Plug the power cord into the power receptacle.
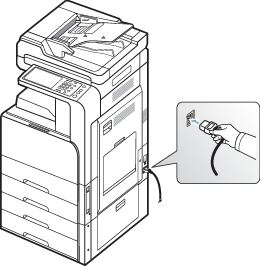
-
Plug the other end into a properly grounded AC outlet.
-
Turn on the main power switch.
|
|
|
|
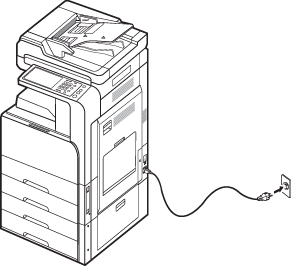
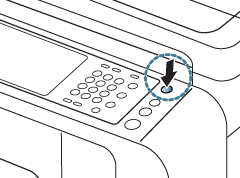
Turning the machine off
If you need to turn the machine off, press the button for more than three seconds on the right side of the control panel. When the confirmation window appears, press from the display screen, then wait until power is turned off automatically.
|
|
|
|
|
|
|
|
If you turn the machine off directly using the main power switch above the power receptacle, it could cause a hard disk problem in the machine. |
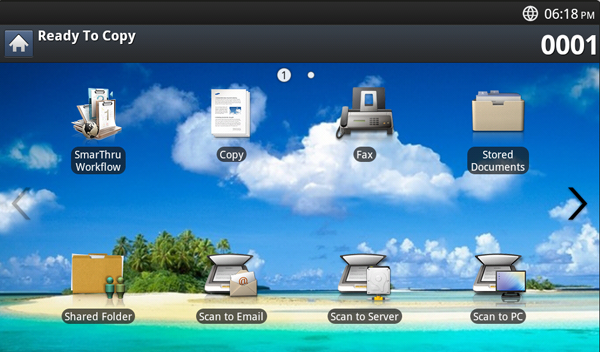
Introducing the display screen and useful buttons
Display screen
The display screen on the control panel allows user-friendly
operation of the machine. Once you press the home icon ( ) on
the screen, it shows the display screen. The display
screen image in this user’s guide may differ from your
machine depending on its options or models.
) on
the screen, it shows the display screen. The display
screen image in this user’s guide may differ from your
machine depending on its options or models.
|
|
|
|
-
: Enters the menu (see Copying).
-
: Enters the menu. is activated on the display screen by installing an optional fax kit (see Faxing (optional)).
-
: Enters the menu (see Understanding the Stored Document screen).
-
: Enters the menu (see Understanding the Shared Folder screen).
-
: Enters the menu (see Scanning originals and sending through email (scan to email)).
-
: Enters the menu (see Scanning originals and sending via SMB/FTP (Scan to server)).
-
: Enters the menu (see Scanning originals and sending to your computer (scan to PC)).
-
: Enters the menu.
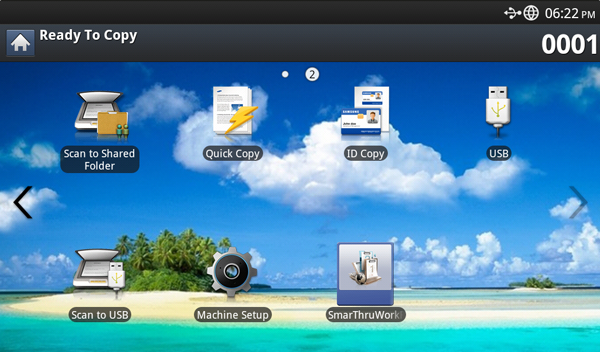
-
: Enters the menu (see Using the menu).
-
: Enters the menu (see Using the menu).
-
: Enters the menu. When a USB memory device is inserted into the USB memory port on your machine, is activated on the display screen (see Using a USB memory device).
-
: Enters the menu. When a USB memory device is inserted into the USB memory port on your machine, is activated on the display screen (see Scanning originals and sending to a USB memory device (scan to USB)).
-
: You can browse current machine settings or change machine values.
Some menus are only configured by an administrator or an authorized user who has an ID and password registered on the machine by an administrator. When the machine requests, enter the ID and password.
-
: Enters the menu (see using Smarthru Workflow, shared Folder, and stored document).
button
When you press the button on the control panel, You can see the number of impressions.
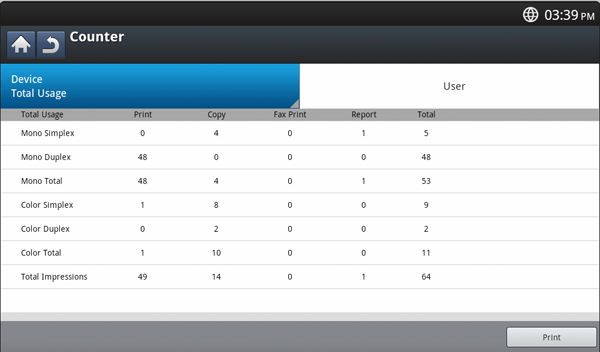
When you select , you can see the number of impressions by device. An impression typically refers to a single side of a sheet and not a one-sided print.
-
: Displays the total number of impressions.
-
: Displays the total number of impressions with large size paper.
-
: Displays the number of images sent via email, server, etc.
-
: Displays the number of sent faxes.
When you select , you can see the number of usage, limit, and remaining usage by each user. For detailed information about , refer to the Administrator’s Guide.
The eco feature allows you to save print resources and leads
you to eco-friendly printing. When you press the button, the machine
turns eco mode on or off. If the eco mode is on, you
can see the eco image ( ) on some
features. Some options in the features are not available
to use in the eco mode. For detailed information about
the eco feature, refer to the Administrator’s
Guide.
) on some
features. Some options in the features are not available
to use in the eco mode. For detailed information about
the eco feature, refer to the Administrator’s
Guide.
|
|
|
|
|
Status |
Description |
|
|---|---|---|
|
Off |
The machine is not in Eco mode. |
|
|
Green |
On |
The machine is in Eco mode. |
When you press the button, the screen lists the currently running, queued, and completed jobs.

Displays the list of jobs in progress and pending.
Pressing the job name shows more detailed information.
-
: Gives the order of jobs.
-
: Displays type of the job, such as print, copy, fax, etc.
-
: Displays the name of the job.
-
: Displays the name of the job owner.
-
: Displays the current status of each job (see Meaning of status).
-
: Promotes a selected job from the list when many jobs are queued. The selected job cannot be promoted in front of a job in progress.
You cannot use the button depending on the state of the job.
-
: Holds a selected job from the list.
You cannot use the button depending on the state of the job.
-
: Removes a selected job from the list.
Displays the list of completed jobs.
Pressing the job name shows more detailed information.
-
: Gives the order of jobs.
-
: Displays type of the job, such as print, copy, fax, etc.
-
: Displays the name of the job.
-
: Displays the name of the job owner.
-
: Displays the status of each completed job (see Meaning of status).
Meaning of status
-
: The machine is receiving data from the network or fax line.
-
: The machine is processing the image (decoding, encoding, converting data format).
-
: The machine is generating the image for printing.
-
: The job in the job queue is waiting for its turn.
-
: The machine is transferring the data to email, server, or fax.
-
: The machine is scanning.
-
: In the fax mode, the machine is dialing to the receiver’s fax machine.
-
: In the fax mode, the machine is waiting to connect to destination.
-
: The machine is printing.
-
: The data is storing to a box or a USB.
-
: The job is temporarily stopped until the time you set for (email, fax, server).
-
: In the tab, the job is temporarily stopped when secure print job is sent from a computer. You can release the job by pressing .
-
: The job is temporarily stopped when a proof print job is sent from a computer. You can release the job by pressing .
-
: In copy mode, the job is temporarily stopped when the proof copy was selected. You can release the job by pressing .
-
: The job is temporarily stopped when is pressed. You can release the job by pressing .
-
: The job is temporarily stopped until the time you set.
-
: The job is temporarily stopped when the machine has a problem such as paper empty, paper mismatch, etc.
-
: The job is temporarily stopped when the button is pressed for an urgent copy job.
-
: The job is paused when the button is pressed.
-
: The job is completed.
-
: The job is completed with error.
-
: If you select a job in the list and press , the job is deleted.
Displays the list of secured jobs the user has set in the printer driver (see ). You need to enter the and set in the printer driver (see ).
-
: Gives the order of jobs.
-
: Displays type of the job.
-
: Displays the name of the job.
-
: Displays the name of the job owner.
-
: Displays detailed information of the selected job. You can also change the number of copies by pressing .
-
: Changes the of the selected job.
-
: Removes the selected job from the list.
-
: Prints the selected job from the list.
-
: Closes the job status window.
Displays any error messages and codes that have occurred.
-
: Gives the order of messages.
-
: Displays the error messages for the current errors in the machine.
-
: Displays the error message's code.
-
: Displays detailed information of the selected job.
-
: Closes the job status window.
When you press ( ), the
machine goes into interrupt mode, which means it stops
the current printing job for an urgent copy job. When the
urgent copy job is completed, the previous printing job
continues.
), the
machine goes into interrupt mode, which means it stops
the current printing job for an urgent copy job. When the
urgent copy job is completed, the previous printing job
continues.
|
|
|
|
When you select the staple feature for a printing job, interrupt mode works after stapling is completed in the printing job. |
|
Status |
Description |
|
|---|---|---|
|
Off |
The machine is not in interrupt printing mode. |
|
|
Green |
On |
The machine is in interrupt printing mode. |