This chapter gives helpful information for what to do if you encounter an error. If your machine has a display screen, check the message on the display screen first to solve the error. If you cannot find a solution in this User's Guide or the problem consists, call for service.
When a toner is low, faded or light areas may appear. It is possible that colored images may be printed with incorrect colors due to flawed mixing of toner colors when the toner level of the colored toner cartridge is low. You can temporarily improve print quality by redistributing the toner.
-
The toner-related message saying that the toner is low may appear on the display.
-
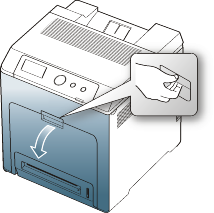
Using the handle, completely open the front cover.
![[Caution]](../common/caution.png)
-
Do not touch the green surface, the OPC drum or the front of the toner cartridge, with your hands or any other material. Use the handle on each cartridge in order to avoid touching this area.
-
Be careful not to scratch the surface of the paper transfer belt.
-
If you leave the front cover open for more than a few minutes, the OPC drum can be exposed to light. This will cause damage to the OPC drum. Close the front cover when the installation need to be halted for any reason.
-
-
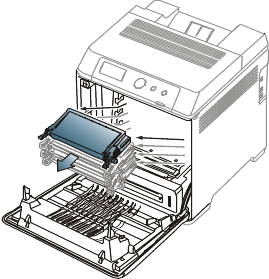
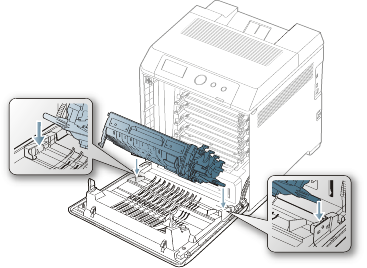
Press the green release handle to release the paper transfer belt. Holding the handle on the paper transfer belt, lift it out of the machine.

-
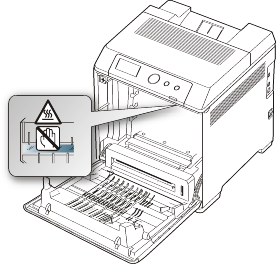
Grasp the handles on the toner cartridge and pull the cartridge out.
If you open the front cover, be careful not to touch the underneath the control panel (the lower part of the fuser unit). The temperature of the fuser unit might be high and could damage your skin.
![[Note]](../common/note.png)
When you open the front cover and work inside the machine, it is highly recommend that you remove the paper transfer belt first. Because the work you do could contaminate the paper transfer belt.
-
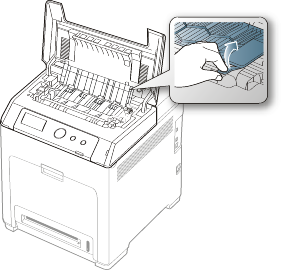
Holding both handles on the toner cartridge, thoroughly rock it from side to side to redistribute the toner.
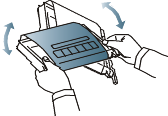
If toner gets on your clothing, wipe it off with a dry cloth and wash clothing in cold water. Hot water sets toner into fabric.
-
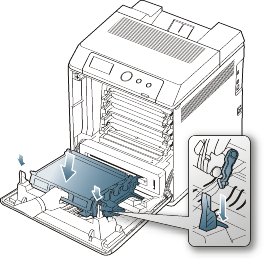
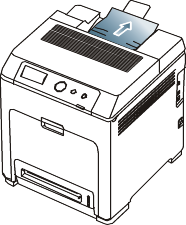
Slide the toner cartridge back into the machine.
-
Holding the handle on the paper transfer belt, align it with the slots on the inside of the front cover.
-
Lower the paper transfer belt until it is parallel with the front cover and firmly seated.
-
Close the front cover. Ensure that the cover is securely closed.
If the front cover is not completely closed, the machine will not operate.
By selecting the correct media types, most paper jams can be avoided. When a paper jam occurs, refer to the next guidelines.
-
Ensure that the adjustable guides are positioned correctly. (See Loading paper in the tray.)
Do not overload the tray. Ensure that the paper level is below the paper capacity mark on the inside of the tray.
-
Do not remove paper from the tray while your machine is printing.
-
Flex, fan, and straighten paper before loading.
-
Do not use creased, damp, or highly curled paper.
-
Do not mix paper types in a tray.
-
Use only recommended print media. (See Setting the paper size and type.)
-
Ensure that the recommended side of the print media is facing up in the tray, or facing down in the multi-purpose tray.
-
If paper jams occur frequently when you print on A5/B5-sized paper: Load the paper into the tray with the long edge facing the front of the tray.
If load the paper this way, printing both sides of the paper (duplex) is not supported.
In the window, set the page orientation to be rotated 180 degrees. (See Opening printing preferences.)
When a paper jam occurs, a warning message appears on the display.
|
|
|
|
To avoid tearing the paper, pull the jammed paper out slowly and gently. Follow the instructions in the following sections to clear the jam. |
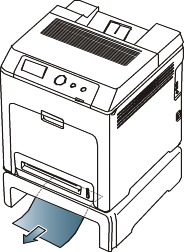
In tray 1
If paper is jammed in the paper feed area, follow the next steps to release the jammed paper.
-
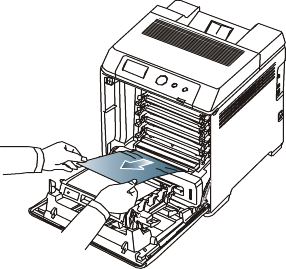
Using the handle, completely open the front cover.
-
Carefully remove the paper by pulling in the direction as shown below.

-
Close the front cover.
If the front cover is not completely closed, the machine will not operate.
-
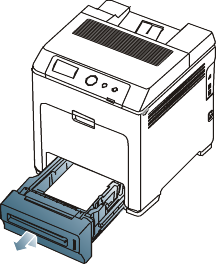
Pull out tray 1.
-
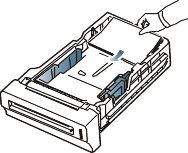
Remove the jammed paper by gently pulling it straight out as shown below.

-
Insert tray 1 back into the machine until it snaps into place. Printing automatically resumes.
In optional trays
|
|
|
|
This part explains the method of removing the jammed paper in the optional tray 2. Please refer to the next method for other optional trays, since the method is same as the optional tray 3. |
-
Pull out optional tray 2 open.
-
Remove the jammed paper from the machine.
If the paper does not move when you pull or if you do not see the paper in this area, stop and go to the next step.
-
Open the front cover.
-
Pull the jammed paper out in the direction shown. To avoid tearing the paper, pull it out gently and slowly.
-
Close the front cover and insert the trays back into the machine. Printing automatically resumes.
If the front cover is not completely closed, the machine will not operate.
In the multi-purpose tray
|
|
|
|
When you print using the multi-purpose tray and the machine detects that there is either no paper or that the paper has been improperly loaded, follow the next steps to release the jammed paper. |
-
If the paper is not feeding properly, pull the paper out of the machine.
If you do not see the jammed paper or if there is any resistance when you pull, stop and go to step 3.
-
Open and close the front cover to resume printing.
If the front cover is not completely closed, the machine will not operate.
-
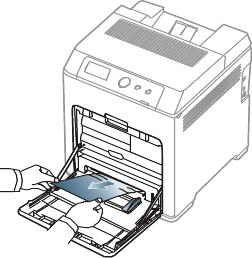
Using the handle, completely open the front cover.
-
Remove the jammed paper by pulling in the direction shown. To avoid tearing the paper, pull it out gently and slowly.
-
Do not touch the green surface, the OPC drum or the front of the toner cartridge, with your hands or any other material. Use the handle on each cartridge in order to avoid touching this area.
-
Be careful not to scratch the surface of the paper transfer belt.
-
If you leave the front cover open for more than a few minutes, the OPC drum can be exposed to light. This will cause damage to the OPC drum. Close the front cover when the installation need to be halted for any reason.
-
-
Close the front cover to resume printing.
If the front cover is not completely closed, the machine will not operate.
In the fuser unit area
|
|
|
|
The fuser area is hot. Take care when removing paper from the machine. |
-
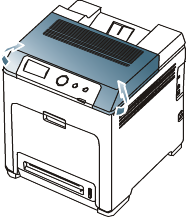
Open the top cover.
-
Open the inner cover using the handle on it.
Do not touch the fuser inside the inner cover. It is hot and could cause burns! The fuser's operating temperature is 180°C (356°F). Take care when removing paper from the machine.
-
Pull up the paper jam lever to loose the fusing part of the fuser unit and carefully take the jammed paper out of the machine.

-
Press down the paper jam lever to fasten the fusing part.
-
Close the inner cover.
-
After removing the jammed paper, check for paper which may be jammed in other parts of the machine.
-
Close the top cover. Ensure that the cover is securely closed.
If the top cover is not completely closed, the machine will not operate.
In exit area
-
Open and close the front cover. The jammed paper is automatically ejected from the machine.
-
Gently pull the paper out of the output tray.
If you do not see the jammed paper or if there is any resistance when you pull, stop and see In the fuser unit area.
-
Open and close the front cover to resume printing.
If the front cover is not completely closed, the machine will not operate.
In the duplex unit area
-
Using the handle, completely open the front cover.
Be careful not to scratch the surface of the paper transfer belt.
-
Press the green release handle to release the paper transfer belt. Holding the handle on the paper transfer belt, lift it out of the machine.
-
Remove the jammed paper by pulling in the direction shown. To avoid tearing the paper, pull it out gently and slowly.

-
Holding the handle on the paper transfer belt, align it with the slots on the inside of the front cover.
-
Lower the paper transfer belt until it is parallel with the front cover and firmly seated.
-
Close the front cover to resume printing.
If the front cover is not completely closed, the machine will not operate.
Messages appear on the control panel display to indicate the machine’s status or errors. Some error messages are shown with graphics to help you troubleshoot problem.
Checking display messages
-
When errors occur, appears on the display and press .
-
Check the display message to see what kind of error has occured.
If several messages appear, press the up/down arrow to highlight the message you want solve.
-
Press on the control panel.
Refer to the tables below to understand the messages’ and their meaning, and solve the problem, if necessary.
|
|
|
|
|
Message |
Meaning |
Suggested solutions |
|||
|---|---|---|---|---|---|
|
|
The toner cartridge is wrong installed. |
Open and close the front cover. If the problem persists, call for service. |
|||
|
|
Small amount of toner is left in the cartridge. The estimated cartridge life of toner is close. |
Prepare a new cartridge for replacement. You may temporarily increase the printing quality by redistributing the toner. (See Redistributing toner.) |
|||
|
|
A toner cartridge has almost reached its estimated cartridge life. |
You can choose or as shown on the control panel. If you select , the printer stops printing and you cannot print any more without changing the cartridge. If you select , the printer keeps printing but the printing quality cannot be guaranteed. Replace the toner cartridge for the best print quality when this message appears. Using a cartridge beyond this stage can result in printing quality issues. (See Replacing the toner cartridge.)
|
|||
|
|
A toner cartridge has reached its estimated cartridge life. The printer stops printing.
|
Replace the toner cartridge. (See Replacing the toner cartridge.) |
|||
|
|
The toner cartridge you have installed is not for your machine. |
Install a Samsung-genuine toner cartridge, designed for your machine. |
|||
|
|
The toner cartridge is not installed or the CRUM (Consumer Replaceable Unit Monitor) in the cartridge is not properly connected. |
Reinstall the toner cartridge two or three times. If the problem persists, the toner cartridge is not being detected. Call for service. |
|||
|
|
The front cover or the top cover is not securely latched. |
Close the cover until it locks into place. |
|||
|
|
There is a problem in the machine. |
Turn the machine off and turn it on again. If the problem persists, call for service. |
|||
|
|
There is a problem in the machine. |
Turn the machine off and turn it on again. If the problem persists, call for service. |
|||
|
Prepare new fuser unit |
The life of the fuser unit will expired soon. |
Call for service. |
|||
|
|
The life of the fuser unit has expired. |
Call for service. |
|||
|
|
The fuser unit is not installed. |
Call for service. |
|||
|
|
Paper has jammed during duplex printing. |
Clear the jam. (See In the duplex unit area .) |
|||
|
|
|||||
|
|
Paper has jammed in cartridge area. |
Clear the jam. (See In the fuser unit area.) |
|||
|
|
Paper has jammed in exit area. |
Clear the jam. (See In exit area.) |
|||
|
|
There is a problem in the machine. |
Turn the machine off and turn it on again. If the problem persists, call for service. |
|||
|
|
The machine is in a room with improper room temperature. |
Move the machine to a room with proper room temperature. (See General specifications.) |
|||
|
|
There is a problem in the machine. |
Turn the machine off and turn it on again. If the problem persists, call for service. |
|||
|
|
The document output tray is full. |
Once the paper is removed from the document output tray, the printer resumes printing. |
|||
|
|
There is no paper in the multi-purpose tray. |
Load paper in the multi-purpose tray. (See Multi-purpose tray.) |
|||
|
|
There is no paper in the tray. |
Load paper in the tray. (See Tray 1 / optional trays.) |
|||
|
|
Paper has jammed in the multi-purpose tray area. |
Clear the jam. (See In the multi-purpose tray.) |
|||
|
|
Paper has jammed in the tray1 area. |
Clear the jam. (See In tray 1.) |
|||
|
|
Paper has jammed in the tray2 area. |
Clear the jam. (See In optional trays.) |
|||
|
|
Paper has jammed in the tray3 area. |
Clear the jam. (See In optional trays.) |
|||
|
Continue |
There is no corresponding paper in the corresponding multi-purpose tray. |
Load corresponding paper in the corresponding multi-purpose tray. (See Multi-purpose tray.) |
|||
|
Continue |
There is no corresponding paper in the corresponding tray. |
Load corresponding paper in the corresponding tray. (See Tray 1 / optional trays.) |
|||
|
|
The life of the tray Retard roller has expired. |
Call for service. |
|||
|
|
The life of the Dust Cleaning Kit has expired. |
Call for service. |
|||
|
|
The toner cartridge has reached the end of its lifespan. |
Replace the toner cartridge with a Samsung-genuine toner cartridge. (See Replacing the toner cartridge.) |
|||
|
|
The engine in your printer is checking some problems detected. |
Please wait a few minutes. |
|||
|
|
There is a problem in the sensor signal. |
Turn the machine off and turn it on again. If the problem persists, call for service. |
|||
|
|
There is a problem in the machine. |
Turn the machine off and turn it on again. If the problem persists, call for service. |
|||
|
|
The life of the transfer belt will expired soon. |
Order the transfer belt with a new one. |
|||
|
|
The life of the transfer belt has expired. |
Replace the paper transfer belt with a new one. Install a Samsung-genuine transfer belt. (See Replacing the paper transfer belt.) |
|||
|
|
The tray is not properly closed. |
To close the tray, lower the rear edge, align it with the slot, and slide it into the printer. |
|||
|
|
The machine cannot communicate the optional trays. |
Reinstall the optional trays. If the problem persists, call for service. |
|||
|
|
The optional trays is not installed. |
Reinstall the optional trays. If the problem persists, call for service. |
|||
|
|
The transfer belt of the machine is not for your machine. |
Install the a Samsung-genuine part designed for your machine. (See Replacing the paper transfer belt.) |
|||
|
|
The transfer belt is not installed. |
Install a Samsung-genuine transfer belt. (See Replacing the paper transfer belt.) |
![[Warning]](../common/warning.png)


Solving other problems
The following chart lists some conditions that may occur and the recommended solutions. Follow the suggested solutions until the problem is corrected. If the problem persists, call for service.
|
Condition |
Suggested solutions |
|---|---|
|
Paper jams during printing. |
Clear the paper jam. (See Clearing paper jams.) |
|
Paper sticks together. |
|
|
Multiple sheets of paper do not feed. |
Different types of paper may be stacked in the tray. Load paper of only one type, size, and weight. |
|
Paper does not feed into the machine. |
|
|
The paper keeps jamming. |
|
|
Transparencies stick together in the paper exit. |
Use only transparencies specifically designed for laser printers. Remove each transparency as it exits from the machine. |
|
Envelopes skew or fail to feed correctly. |
Ensure that the paper guides are against both sides of the envelopes. |
Printing problems
|
Condition |
Possible cause |
Suggested solutions |
|||
|---|---|---|---|---|---|
|
The machine does not print. |
The machine is not receiving power. |
Check the power cord connections. Check the power switch and the power source. |
|||
|
The machine is not selected as the default machine. |
Select your machine as your default machine in your Windows. |
||||
|
Check the machine for the following:
If a system error occurs, contact your service representative. |
|||||
|
The connection cable between the computer and the machine is not connected properly. |
Disconnect the machine cable and reconnect it. |
||||
|
The connection cable between the computer and the machine is defective. |
If possible, attach the cable to another computer that is working properly and print a job. You can also try using a different machine cable. |
||||
|
The port setting is incorrect. |
Check the Windows printer setting to make sure that the print job is sent to the correct port. If the computer has more than one port, make sure that the machine is attached to the correct one. |
||||
|
The machine may be configured incorrectly. |
Check the to ensure that all of the print settings are correct. (See Opening printing preferences.) |
||||
|
The printer driver may be incorrectly installed. |
Repair the machine software. (See Installing the driver locally.) |
||||
|
The machine is malfunctioning. |
Check the display message on the control panel to see if the machine is indicating a system error. Contact a service representative. |
||||
|
(Continued) The machine does not print. |
The document size is so big that the hard disk space of the computer is insufficient to access the print job. |
Get more hard disk space and print the document again. |
|||
|
The machine selects print materials from the wrong paper source. |
The paper option that was selected in the may be incorrect. |
For many software applications, the paper source selection is found under the tab within the . Select the correct paper source. See the printer driver help screen. (See Opening printing preferences.) |
|||
|
A print job is extremely slow. |
The job may be very complex. |
Reduce the complexity of the page or try adjusting the print quality settings. |
|||
|
Half the page is blank. |
The page orientation setting may be incorrect. |
Change the page orientation in your application. See the printer driver help screen. |
|||
|
The paper size and the paper size settings do not match. |
Ensure that the paper size in the printer driver settings matches the paper in the tray.Or, ensure that the paper size in the printer driver settings matches the paper selection in the software application settings you use. |
||||
|
The machine prints, but the text is wrong, garbled, or incomplete. |
The machine cable is loose or defective. |
Disconnect the machine cable and reconnect. Try a print job that you have already printed successfully. If possible, attach the cable and the machine to another computer that you know works and try a print job. Finally, try a new machine cable. |
|||
|
The wrong printer driver was selected. |
Check the application’s printer selection menu to ensure that your machine is selected. |
||||
|
The software application is malfunctioning. |
Try printing a job from another application. |
||||
|
The operating system is malfunctioning. |
Exit Windows and reboot the computer. Turn the machine off and back on again. |
||||
|
If you are in a DOS environment, the font setting for your machine may be set incorrectly. |
Change the language setting. (See Changing font setting .) |
||||
|
Pages print, but they are blank. |
The toner cartridge is defective or out of toner. |
Redistribute the toner, if necessary. If necessary, replace the toner cartridge. |
|||
|
The file may have blank pages. |
Check the file to ensure that it does not contain blank pages. |
||||
|
Some parts, such as the controller or the board, may be defective. |
Contact a service representative. |
||||
|
The machine does not print PDF file correctly. Some parts of graphics, text, or illustrations are missing. |
Incompatibility between the PDF file and the Acrobat products. |
Printing the PDF file as an image may enable the file to print. Turn on from the Acrobat printing options.
|
|||
|
The print quality of photos is not good. Images are not clear. |
The resolution of the photo is very low. |
Reduce the photo size. If you increase the photo size in the software application, the resolution will be reduced. |
|||
|
Before printing, the machine emits vapor near the output tray. |
Using damp paper can cause vapor during printing. |
This is not a problem. Just keep printing. |
|||
|
The machine does not print special- sized paper, such as billing paper. |
Paper size and paper size setting do not match. |
Go to the printer properties and click the paper tab. Correct the paper size in the custom option. (See Opening printing preferences.) |
|||
If the inside of the machine is dirty or paper has been loaded improperly, there might be a reduction in print quality. See the table below to clear the problem.
|
Condition |
Suggested Solutions |
|---|---|
|
Light or faded print 
|
|
|
The top half of the paper is printed lighter than the rest of the paper 
|
The toner might not adhere properly to this type of paper.
|
|
Toner specks 
|
|
|
Dropouts 
|
If faded areas, generally rounded, occur randomly on the page:
|
|
White Spots 
|
If white spots appear on the page:
|
|
Vertical lines 
|
If black vertical streaks appear on the page:
If white vertical streaks appear on the page:
|
|
Color or Black background 
|
If the amount of background shading becomes unacceptable:
|
|
Toner smear 
|
If toner smears on the page:
|
|
Vertical repetitive defects 
|
If marks repeatedly appear on the printed side of the page at even intervals:
|
|
Background scatter 
|
Background scatter results from bits of toner randomly distributed on the printed page.
|
|
Toner particles are around bold characters or pictures 
|
The toner might not adhere properly to this type of paper.
|
|
Misformed characters 
|
|
|
Page skew 
|
|
|
Curl or wave 
|
|
|
Wrinkles or creases 
|
|
|
Back of printouts are dirty 
|
|
|
Solid Color or Black pages 
|
|
|
Loose toner 
|
|
|
Character Voids 
|
Character voids are white areas within parts of characters that should be solid black:
|
|
Horizontal stripes 
|
If horizontally aligned black streaks or smears appear:
|
|
Curl 
|
If the printed paper is curled or paper does not feed into the machine:
|
|
An unknown image repetitively appears on a few sheets or loose toner, light print, or contamination occurs. |
Your machine is probably being used at an altitude of 1,000 m (3,281 ft) or above.The high altitude may affect the print quality, such as loose toner or light imaging. Change the correct altitude setting to your machine. (See Altitude adjustment.) |
The following situations are PS language specific and may occur when several printer languages are used.
|
Problem |
Possible cause |
Solution |
|---|---|---|
|
PostScript file cannot be printed. |
The PostScript driver may not be installed correctly. |
|
|
“Limit Check Error” report prints. |
The print job was too complex. |
You might need to reduce the complexity of the page or install more memory. (See Installing a memory module.) |
|
A PostScript error page prints. |
The print job may not be PostScript. |
Make sure that the print job is a PostScript job. Check to see whether the software application expected a setup or PostScript header file to be sent to the machine. |
|
The optional tray is not selected in the driver. |
The printer driver has not been configured to recognize the optional tray. |
Open the PostScript driver properties, select the tab, and set the tray option. |
|
When printing a document in Macintosh with Acrobat Reader 6.0 or higher, colors print incorrectly. |
The resolution setting in the printer driver may not be matched with the one in Acrobat Reader. |
Make sure that the resolution setting in your printer driver matches the one in Acrobat Reader. |
|
Condition |
Suggested solutions |
|---|---|
|
“File in Use” message appears during installation. |
Exit all software applications. Remove all software from the printer’s startup group, then restart Windows. Reinstall the printer driver. |
|
“General Protection Fault”, “Exception OE”, “Spool 32”, or “Illegal Operation” messages appear. |
Close all other applications, reboot Windows and try printing again. |
|
“Fail To Print”, “A printer timeout error occurred” messages appear. |
These messages may appear during printing. Just keep waiting until the machine finishes printing. If the message appears in standby mode or after printing has been completed, check the connection and/or whether an error has occurred. |
|
|
|
|
Refer to Microsoft Windows User’s Guide that came with your computer for further information on Windows error messages. |
|
condition |
Suggested solutions |
|---|---|
|
The machine does not print. |
|
|
Some color images come out all black. |
This is a known bug in Ghostscript (until GNU Ghostscript version 7.05) when the base color space of the document is indexed color space and is converted through CIE color space. Because Postscript uses CIE color space for Color Matching System, you should upgrade Ghostscript on your system to at least GNU Ghostscript version 7.06 or later. You can find recent Ghostscript versions at www.ghostscript.com. |
|
Some color images come out in unexpected colors. |
This is a known bug in Ghostscript (until GNU Ghostscript version 7.xx) when the base color space of the document is indexed RGB color space and it is converted through CIE color space. Because Postscript uses CIE color space for Color Matching System, you should upgrade Ghostscript on your system to at least GNU Ghostscript version 8.xx or later. You can find recent Ghostscript versions at www.ghostscript.com. |
|
The machine does not print whole pages, and output is printed on half the page. |
It is a known problem that occurs when a color machine is used on version 8.51 or earlier of Ghostscript, 64-bit Linux OS, and has been reported to bugs.ghostscript.com as Ghostscript Bug 688252.The problem is solved in AFPL Ghostscript v. 8.52 or above. Download the latest version of AFPL Ghostscript from http://sourceforge.net/projects/ghostscript/ and install it to solve this problem. |
|
I encounter error “Cannot open port device file” when printing a document. |
Avoid changing print job parameters (via LPR GUI, for example) while a print job is in progress. Known versions of CUPS (Common Unix Printing System) server break the print job whenever print options are changed and then try to restart the job from the beginning. Since Unified Linux Driver locks the port while printing, the abrupt termination of the driver keeps the port locked and unavailable for subsequent print jobs. If this situation occurs, try to release the port by selecting in window. |
|
When printing a document over the network in SuSE 9.2, the printer does not print. |
The CUPS (Common Unix Printing System) version distributed with SuSE Linux 9.2 (cups-1.1.21) has a problem with ipp (Internet Printing Protocol) printing. Use the socket printing instead of ipp or install later version of CUPS (Common Unix Printing System) (cups-1.1.22 or higher). |
|
|
|
|
Refer to Linux User’s Guide that came with your computer for further information on Linux error messages. |
|
condition |
Suggested solutions |
|||
|---|---|---|---|---|
|
The machine does not print PDF files correctly. Some parts of graphics, text, or illustrations are missing. |
Printing the PDF file as an image may enable the file to print. Turn on from the Acrobat printing options.
|
|||
|
The document has printed, but the print job has not disappeared from the spooler in Mac OS X10.3.2. |
Update your MAC OS to MAC OS X 10.3.3. or higher. |
|||
|
Some letters are not displayed normally during the cover page printing. |
Mac OS cannot create the font during the cover page printing. The English alphabet and numbers are displayed normally on the cover page. |
|||
|
When printing a document in Macintosh with Acrobat Reader 6.0 or higher, colors print incorrectly. |
Make sure that the resolution setting in your machine driver matches the one in Acrobat Reader. |
|
|
|
|
Refer to Macintosh User’s Guide that came with your computer for further information on Macintosh error messages. |